What can we help you with?
Generating Bulk Shipment with ELEX WooCommerce DHL Shipping Plugin with Print Label
The article is based on the printing of bulk shipments using the ELEX WooCommerce DHL Shipping Plugin. You’ll find all the settings that can help you achieve successful generation of shipments in bulk.
DHL Shipping Plugin with Print Label and Features
DHL WooCommerce Shipping plugin by ELEX helps WooCommerce based stores to streamline DHL Express shipping integration. This plugin helps you get shipping rates from DHL APIs based on product weight, postcode, and other relevant details. Based on the postal codes and other parameters, all available shipping services along with the rates are listed for the customers to choose from.
The plugin has over 2000+ active downloads which clearly says that it is accepted by customers.
It Integrates WoooCommerce to DHL Services
Once DHL WooCommerce Shipping plugin is installed and configured with necessary information, your WordPress/WooCommerce shop will be ready to ship using DHL Express. This plugin will add the DHL shipping method as one of the shipping methods in WooCommerce. In other situations when you want to use DHL Paket and DHL eCommerce service for shipping, you just need to enable the services in their respective settings.
Setting Up the Services for Bulk Shipment
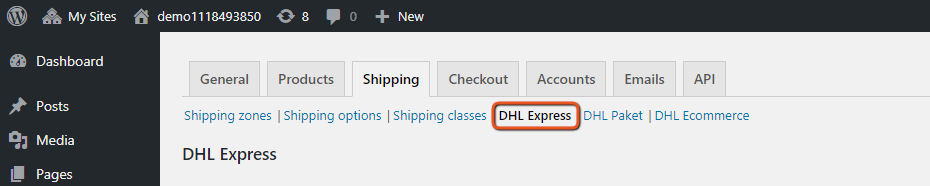
DHL Express
Click on the DHL Express to set up the options for creating bulk shipments in DHL Express. As a reminder, you can follow the string of actions to find DHL Express.
WordPress Dashboard> WooCommerce> Settings> Shipping> and then DHL Express
First, the option you need to look for is the Enable/Disable option. It contains the following two options that impact shipment creation.
- Enable Default Services for Label Generation
- Default Service is the service that your customer chooses during the Cart and Checkout page. For instance, if the customer chooses Express Worldwide as the shipping service, it will be the default service. If you enable this, the plugin creates shipments based on the service chosen by the customer.
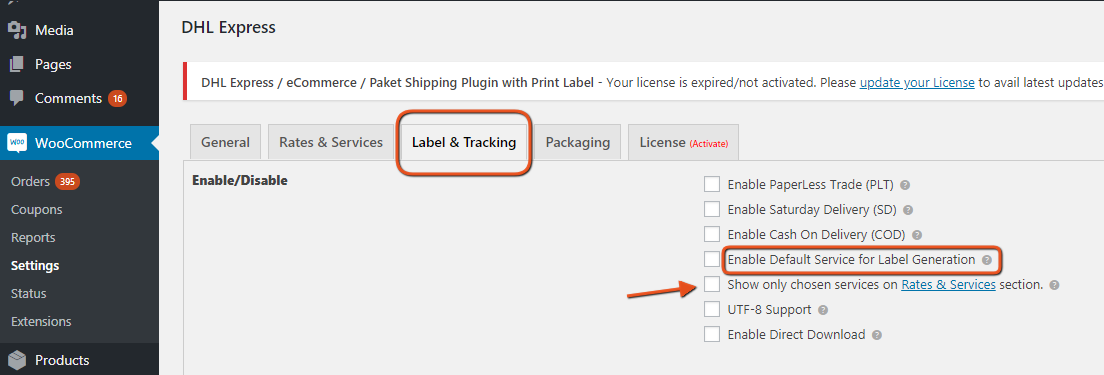
- Show only chosen services on Rates & Services section
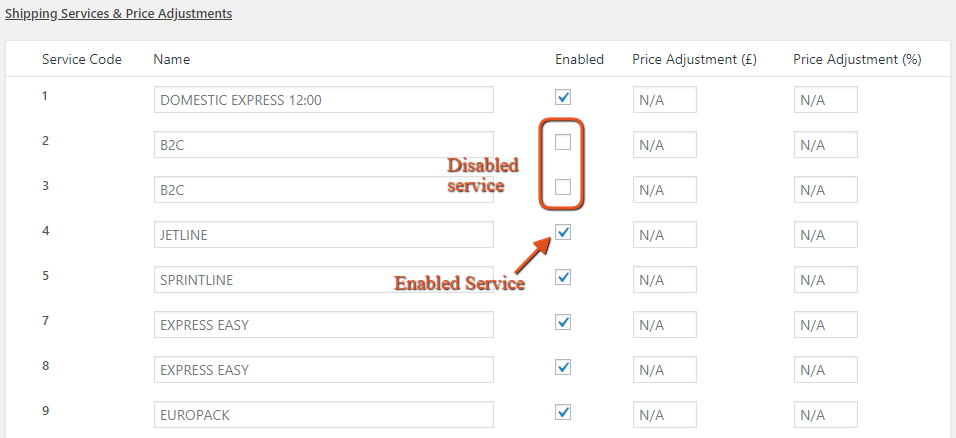
- Rates and services section is next to Label & Tracking and houses all the services offered by DHL Express. You can choose any number of services by marking the respective box. As a result, only the services marked by you will be shown to the customers.
Note: You can control which service you want to show to your customers. To show the chosen Express services only, enable the option of “Show only chosen services on Rates and Services”. The rates and services tab contains all the services offered by DHL Express.
If Default Service for label generation is enabled, it will be the only service that will be available for the creation of shipment in case of bulk shipment. And if you don’t enable default service for label generation, you’ll still have an option to choose your desired service and create the shipment.
Things to Remember
Shipping Content Description- The plugin allows you to add a customized content description that you can write in the space provided. One thing you need to be careful of is this description. This remains the same for all the products. So if you are going to create bulk shipments, its fine. But you need to be very specific about the content description.
This is one of the reasons, the feature of bulk printing of labels is not included. This provides you the liberty of customizing your labels as the creation of bulk shipment does not affect the content description.
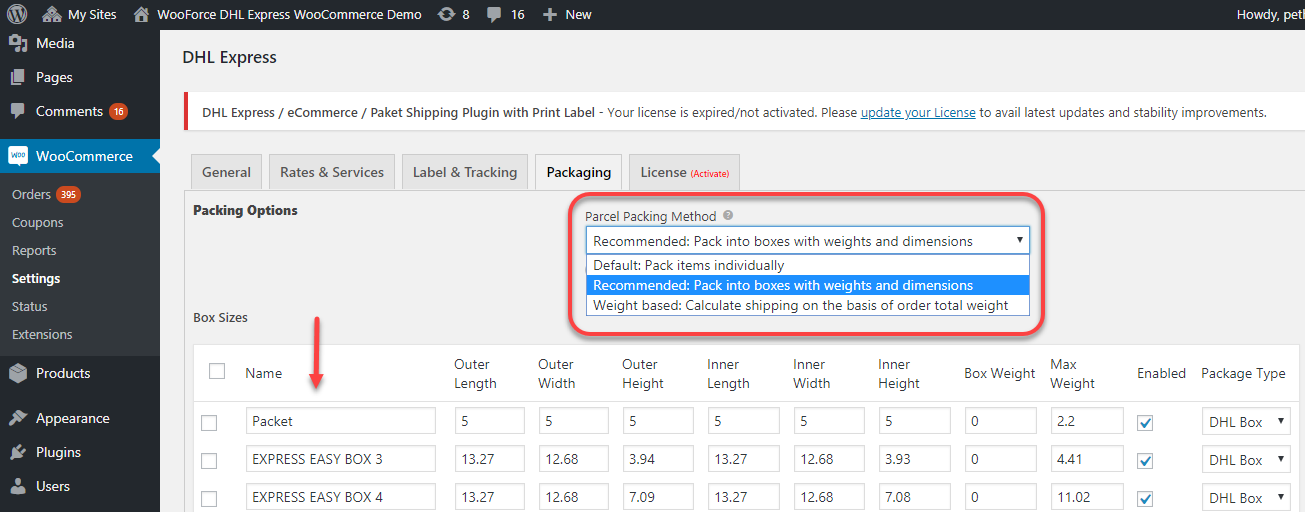
Packing Option- You can also check for the packing options you select to pack the boxes. This of course decides the shipping rates and the number of boxes that will be used during the packing. To use a minimum packing materials and packing volume, you are recommended to go for predefined boxes and use products weight and dimension for packing.
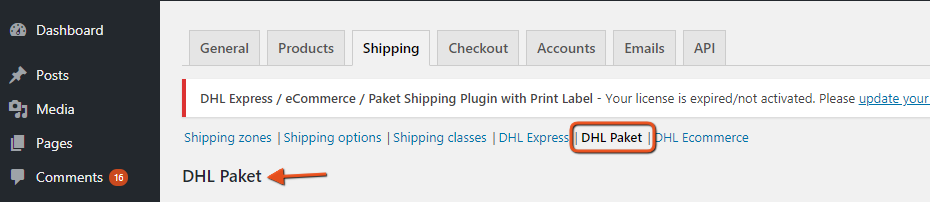
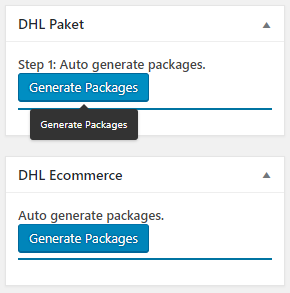
DHL Paket
Navigate to WordPress Dashboard> WooCommerce> Settings> Shipping> and then DHL Paket to get to the DHL Paket settings.
In this case, check for the packing method and the DHL Paket boxes you want to use for the packing purposes. There are not much of settings required here as when you use DHL Paket, you don’t show live rates to customers. So you can actually select the desired service while creating the shipment because customers don’t get options to select a service.
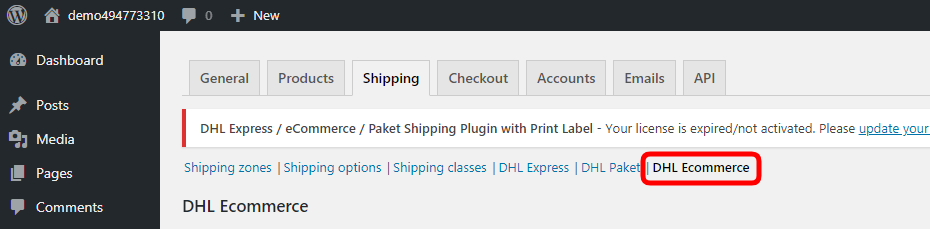
DHL eCommerce
Navigate to WordPress Dashboard> WooCommerce> Settings> Shipping> and then DHL eCommerce to get to the DHL eCommerce settings.
When setting up DHL eCommerce, you need to consider paying attention to:
- The services you want to offer to your customers
- Services you choose will be considered for creating the bulk shipment.
- Contents description
- Create the content description while printing the label. Any text in the settings will print the same text for all labels printed. So you can leave it blank and write the description while printing labels.
- Default service for domestic
- If you want to use any specific shipping service for domestic service for creating and fulfillment of shipment, you can choose from the drop down here.
- Default service for international
- Just like default domestic service, you can choose a default shipping eCommerce service from the drop down here. The service select here will be used to create shipment in all international shipping.
Generating Bulk Shipment
Once you are done setting up the plugin and the three services, whichever you are using, you can move to the orders page. For someone who is new to this, you can navigate to orders by following this string. WordPress Dasboard> WooCommerce> Orders.
From the orders page, select all the orders you want to create shipment by checking the boxes on the left side of the order numbers.
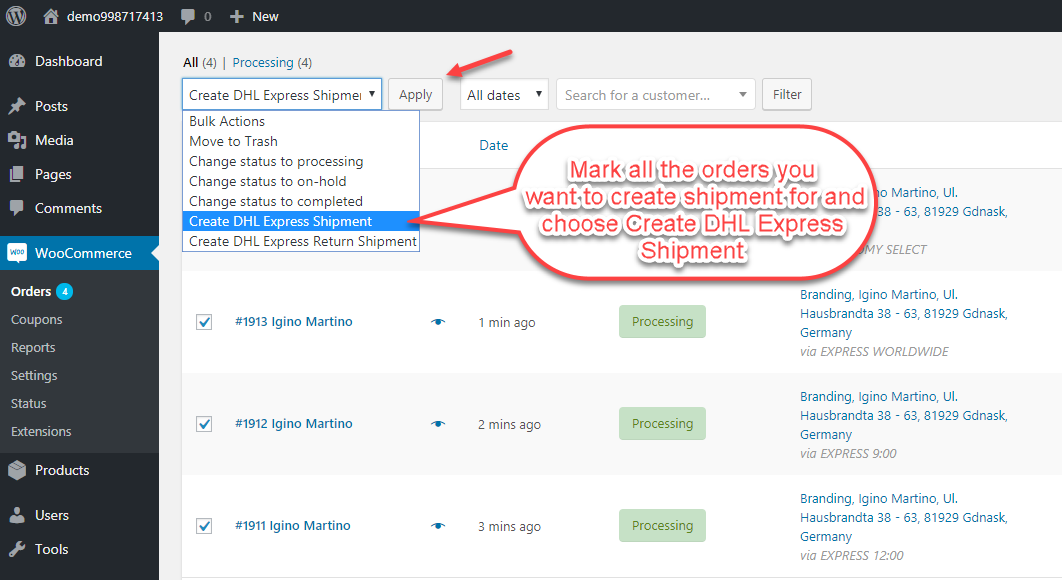
After you select the type of which service you want select to create shipment with, click on apply. You will get messages of the success or failure in shipment creation.
Outcomes in the Order Overview Page
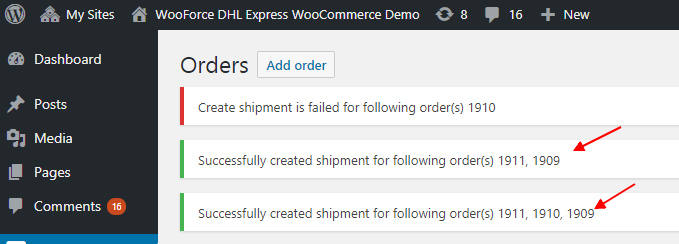
We used three order to create bulk shipments. Lets now see the outcomes in the order review pages.
Order #1909
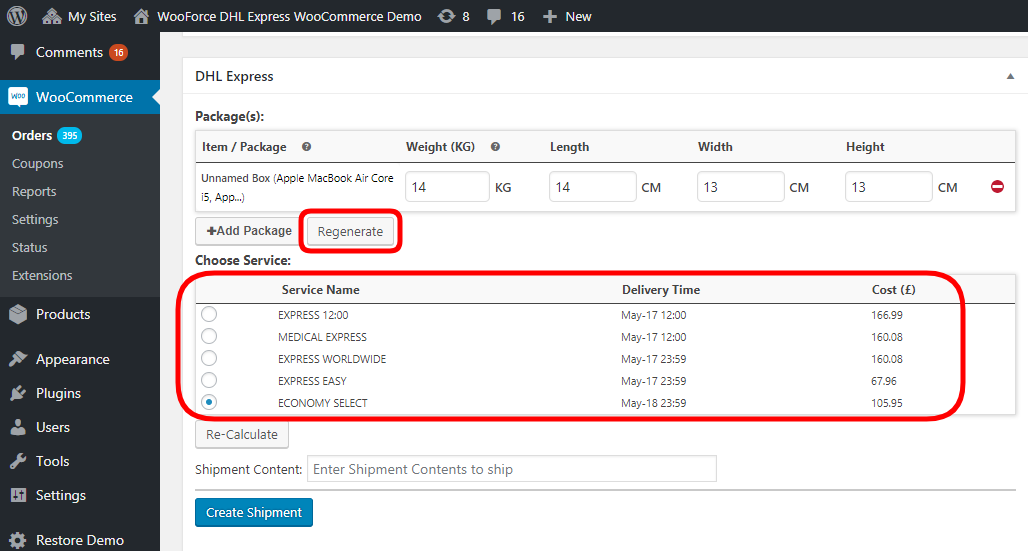
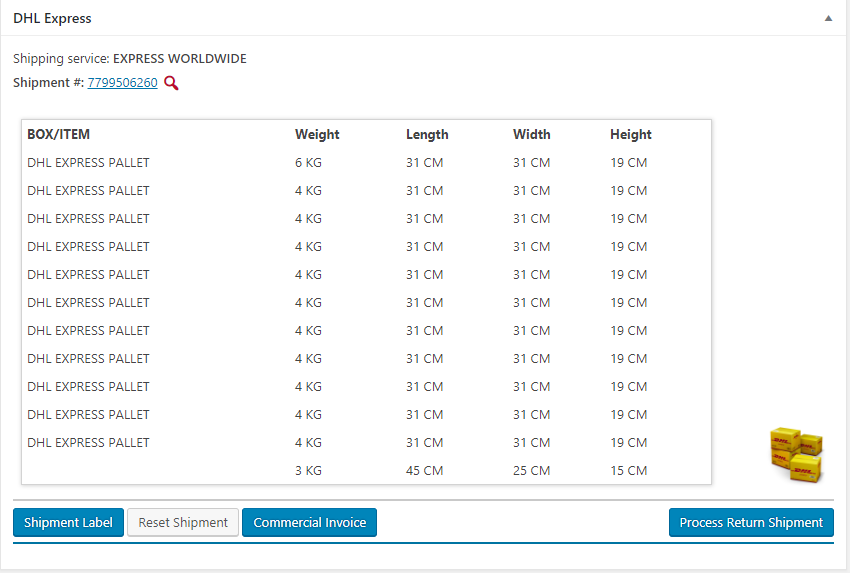
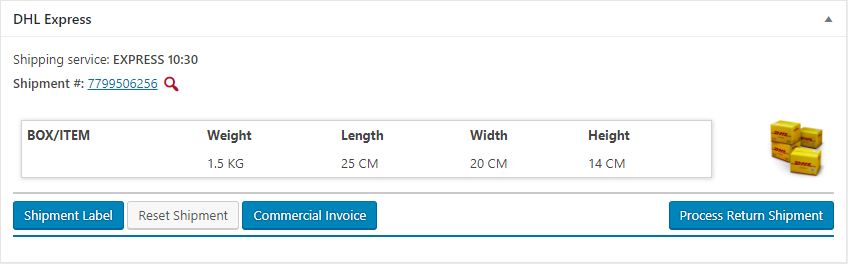
In this order, the shipments are created as shown in the image below. You will find similar details about the successful package generations. The shipment number generated is officially associated with DHL and now the shipment can be found in your DHL account too.
On successful creation of shipment, you can print the labels individually form the order overview pages. Or you can reset the shipment to recreate it. Finally, you can have the commercial invoice printed from the page itself.
Order #1910
In this order, the shipments were not created automatically because:
Shipping services selected by the customer was ‘Flat Rate Fee’ and thus you now need to manually select the available services in the order overview page and generate packages. You can add customized boxes too or recalculate the shipping charges from your end. Once you find out the right service you’ll use to ship, you can create the shipment.
You can avoid manual creation of shipment by removing options like Flat Rate Fee or Free Shipping.

Order #1911
In this order, the shipment is created too as the customer chose a service. And the shipment is created based on the at service. Again, you can now print shipping labels and commercial invoices. If you want you can reset the shipments to create a new one here.
Using DHL Paket and DHL eCommerce for Shipment generation
All these shipments are created using DHL Express option. The plugin has two more option that helps in creating shipments for products. DHL Paket for German Customers of DHL and DHL eCommerce for American continent customers.
Or if you want to generate shipments by these two services, select them from the drop-down on the common order page.
About the plugin
- Cost $79.00
- Live Demo
- Documentation Page
- 30-Day Money Back Guarantee
- Subscription Renewal @20% Discount
Closing Comment
Integrating DHL services to your WooCommerce store can boost your shipping abilities. It increases the capacity of packages you can handle at least available time. Timely delivery is going to ensure customer satisfaction. Features like return label and enabling signature on delivery of the product add peace of mind to you and your customers.
So we recommend using WooCommerce DHL Shipping Plugin for all your shipping needs. We hope this review provides a clear overview of the plugin and you are ready to integrate WooCoommerce DHL to your online store. Visit the product page for more information. Or contact our Online Support for any technical issues or pre-sales queries. Happy Selling!
To explore more details about the plugins, go check out ELEX WooCommerce DHL Express / eCommerce / Paket Shipping Plugin with Print Label.
Read the article for setting up DHL Express understand the plugin, in detail. Or check out the product documentation section for more related articles.
You can also check out other WooCommerce and WordPress plugins in ELEX.