Offers are always attracting customers to grab products as soon as possible. Price drops in your store have the power to improve the sales and conversion rate significantly than before. It is important to let the customers know that you are offering so and so offers in your store and make a purchase before it ends!
A couple of notifications on their mobile phone and a banner on social media may gather the attention of customers regarding the offer. When they click on the respective links you have given, or they directly enter your WooCommerce shop, they should see the offers available for the products. It will be easy for the customers if you display a pricing table that lists all available offers for a particular product.
Benefits of Pricing Table
When a customer visits your WooCommerce store and opens a specific product page, they can make the purchasing decisions immediately. You can display the details regarding the minimum and the maximum number of products to be purchased to be eligible for a discount. So they can purchase more products that satisfy a discount rule to get the offer. It will increase the sales and conversion rate of your business.
If multiple discounts are applicable for a product, customers can make a quick comparison based on their budget and requirements and they can make the purchases accordingly. And they will be aware of each and every offer available for the product before purchasing the products. That is, they will not miss any information regarding an offer available in your store.
You cannot display any pricing table statically on any product page as it is not practical and the offers will change in time. So it should be displayed dynamically according to the offers you provide in your WooCommerce store.
Display Pricing Table for Your WooCommerce Product Pages
As I have already mentioned, it is not practical to display a number of pricing tables on individual product pages statically. It should be generated dynamically based on live discount offers in your store. You can generate the pricing table with the help of a plugin. Since the offers are implemented with a dynamic pricing and discounts plugin, it is more convenient to choose a dynamic pricing plugin that helps you display a pricing table too.
You can simply enable or set a few basic information on the plugin, and it will generate the pricing table automatically when the offers are live. In this article, let us check how you can display pricing table for your WooCommerce product pages with a top-notch dynamic pricing plugin: ELEX WooCommerce Dynamic Pricing and Discounts plugin.
Display Pricing Table for Your WooCommerce Product Pages with ELEX WooCommerce Dynamic Pricing and Discounts Plugin
This plugin is a freemium plugin as you can either go for its free version for basic discount features or upgrade to its premium version for advanced discounts and dynamic pricing features. You can apply advanced discount offers to your customers based on their user roles and previous purchase history. Besides these features, you can display the pricing table and specify the order with which it will be executed, if multiple offers are applicable for specific products.
You can display a pricing table with its premium version as well as the basic version. You can apply offers based on products as well as the product categories with its basic version. You can apply 9 different types of discount rules with its premium version such as:
- Product Rules
- Category Rules
- Combinational Rules
- Category Combinational Rules
- Cart Rules
- Buy and Get Free Offer (BOGO) Rules
- Buy and Get Offer (BOGO) Category Rules
- Tag Rules
- BOGO Tag Rules
One point you need to remember is that the pricing table will only display the offers based on the products. Only the discount rules you have set up on Product Rules which are applicable for a particular product will be displayed on the pricing table.
For more details regarding all rules available in this plugin, you can refer to its documentation.
Product Rules
You can apply discounts and offers to selected products, or all products under a single category and all products in the shopping cart based on their quantity, weight, and price. You can enter their minimum and maximum range accordingly for the discount to be applicable. If a customer purchases the products that satisfy all the settings you have configured in this product rule, they will be eligible for a percentage or a flat discount you have entered. And also you can set a fixed price for replacing the existing price of these products.
The percentage discount will deduct a percentage of the existing price from each unit of the products’ that the customer has been added to the cart. The flat discount will deduct an amount from the cart’s subtotal level.
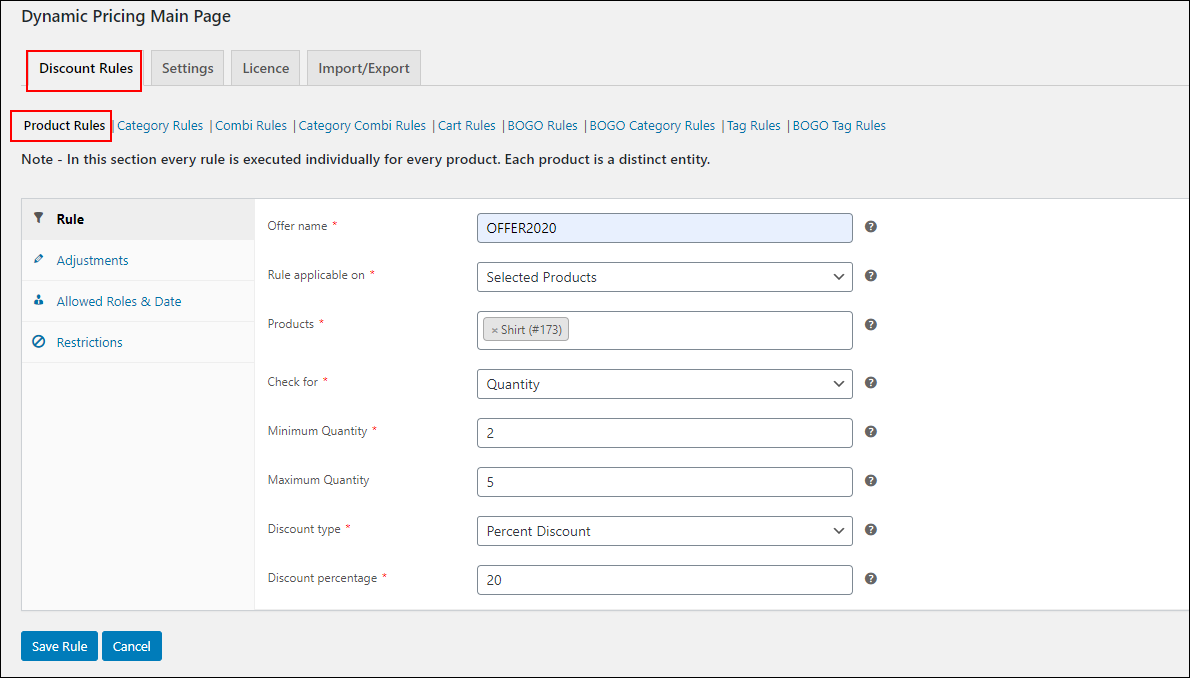
Check an example of product rule:
In the above example, if a customer purchases 2-5 shirts, a 20% discount will be applied to individual products.
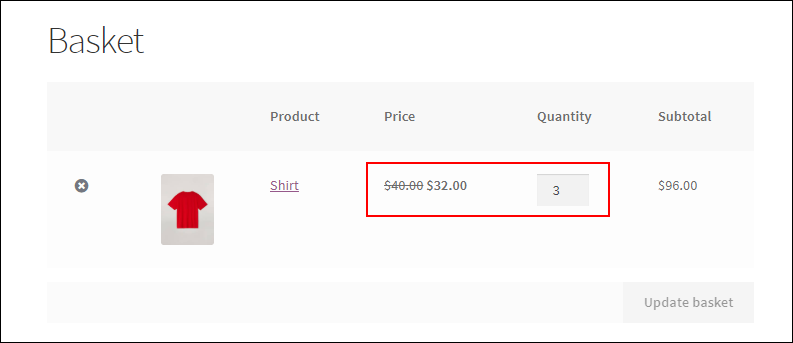
The price of the shirt is $40 and the customer has added 3 products in the cart. After applying a 20% discount, it deducted $8 (20% of 40) from the actual amount of $40.
You can add more discounts to this shirt in product rules. For example:
- All products under the Clothing category can be set to a fixed price of $38 using the fixed price discount. If a customer purchases a minimum of 2 products from the category, they will get this discount.
Since Shirt comes under the Clothing category, it will be eligible for the fixed price discount as well, along with the 20% discount we have set in the first example(on the screenshot).
You can see the two product rules, which are applicable for the Shirt on the above screenshot.
After applying the discounts, you can go to the Settings tab. There you can find an option of Pricing Table.
Set the following details:
Display Prices Table on Product Page: Choose ‘yes’ for displaying the pricing table on the individual product pages. By default, it will be set as ‘yes’. If you want to remove them choose ‘no’ accordingly.
Allowed Roles: Choose the user roles who are eligible to see the pricing table on the individual product pages.
Position of Pricing Table on Product Page: Set the position of the pricing table as to where you want to display it on the product page.
There are 12 options available for you to place the pricing table on the product page such as:
- Before Product
- After Product
- Before Product Summary
- In Product Summary
- After Product Summary
- Before Add To Cart Button
- After Add To Cart Button
- Before Add To Cart Form
- After Add To Cart Form
- Product Thumbnails
- Product Meta Start
- Product Meta End
Short Name For Quantity: Add a custom label name for the number or quantity of the products to be purchased for applying the offer. By default, it will be ‘nos.’
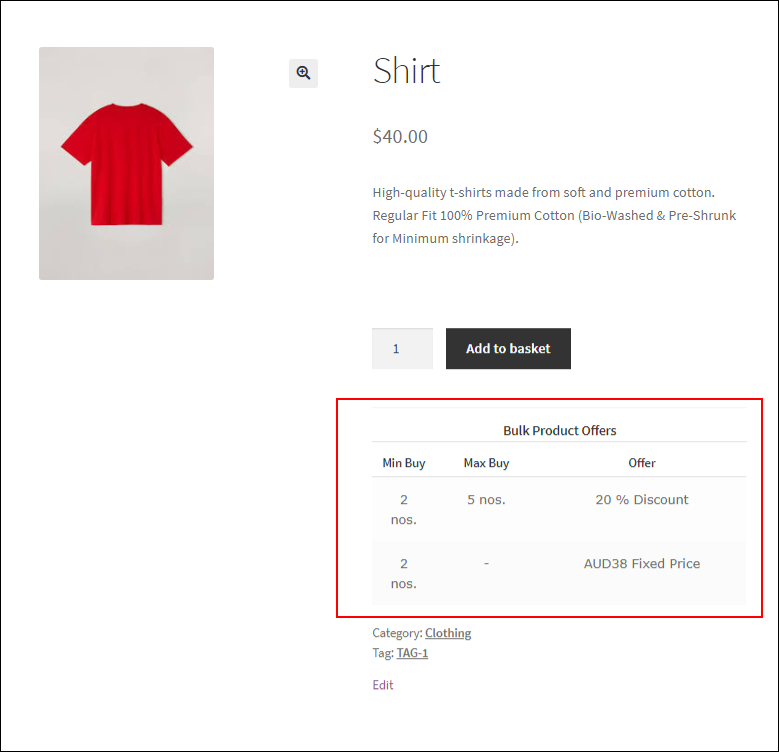
After setting up the pricing table, let us check the example of Shirt. As I have already mentioned, there are 2 rules applicable to the product- Shirt. After the update the product page will be:
You can see the two available offers for the Shirt with the minimum and maximum quantity of products to be purchased for getting the offer. It will help the customers to have an idea on how many products to be purchased.
It will display all product rules applicable to the product. You can also set some advanced restrictions or set the user roles that will be eligible for a specific offer exclusively while creating the product rule.
Advanced Features for Product Rules
You can set the maximum discount amount for the product rule, which will restrict the discount amount. And can also add an adjustment amount as the extra amount to be added to the total amount to be paid by the customers. There is an option to allow repeat execution for the offer rule to be executed if the total quantity of the specific product is a multiple of the minimum or the maximum quantity. But for that, the minimum and the maximum quantity must be equal.
Also, you can restrict the rules to be applicable for selected user roles. Specify the dates for which the discount should be live on your WooCommerce store.
If you want to restrict any specific customers from the discount, enter the customers’ email ID, the minimum number of previous orders, and the minimum total spending on the previous orders. If only these restrictions are met, the discount will be applicable to the customers. Check the screenshot:
In addition to that, you can also enable or disable certain rules which you offer in your store with the right and left shift button. Also, you can reorder the rules on your WooCommerce store admin for setting its priority. This is for determining how the rules or discounts should be applied on the eligible products.
Additionally, you can set a calculation mode for calculating the discounts if multiple discounts are applicable to a product, such as apply the first matching rule on the top priority, the best discount among all applicable rules, or all rules applicable for the product.
You can display all the available discount offers for the product on the individual product pages as Offer Tables. For displaying the offer table also, you can set a position on the product page.
In Closing,
Pricing tables make it more convenient for customers to make purchases and help to make quick decisions regarding the number of products to be purchased. This awareness of all available discounts will lead customers to purchase more products in the place of one product. Hence it will improve the sales and quality leads to your WooCommerce store.


