Any wholesale or B2B business that caters to its customers through an eCommerce store would definitely want more customers reaching out to them requesting quotes for their products, so that they convert inquiries to confirmed orders. The focus of such businesses is usually to sell in bulk or customize their services to suit the customers’ requirements, customizing prices being one such service. WordPress or WooCommerce does not offer this feature out of the box. That is where the ‘Request a Quote’ plugin comes into play, which enables you to provide your customers with the option of requesting a quote for their chosen products and receiving customized prices for the same. In this article, we explain how the request a quote plugin can be customized on your WooCommerce store in five simple steps.
Before we detail the steps on how to customize the request a quote plugin, we would like to give you a peek into the advantages of having such a plugin on your WooStore.
- It is ideal for your wholesale customers who would like to have a better price for the products.
- It will enable your customers to reach out to you easily with their requirements.
- It will help keep proper track of your customers’ requirements/interests and be able to provide them with a custom quote.
- As the business owner, you can have some good pricing strategies in place for bulk purchases.
- It will give your customers the power to negotiate the prices, thus motivating them to proceed with the order.
- It will help avoid cart abandonment, thus boosting conversions.
Integrating and Customizing the Plugin in Five Simple Steps
Detailed below are some simple steps explaining how to install and activate the plugin to suit your requirements. ELEX WooCommerce Request a Quote Plugin is being used for this demo.
Step 1 – Installing and Activating the Plugin
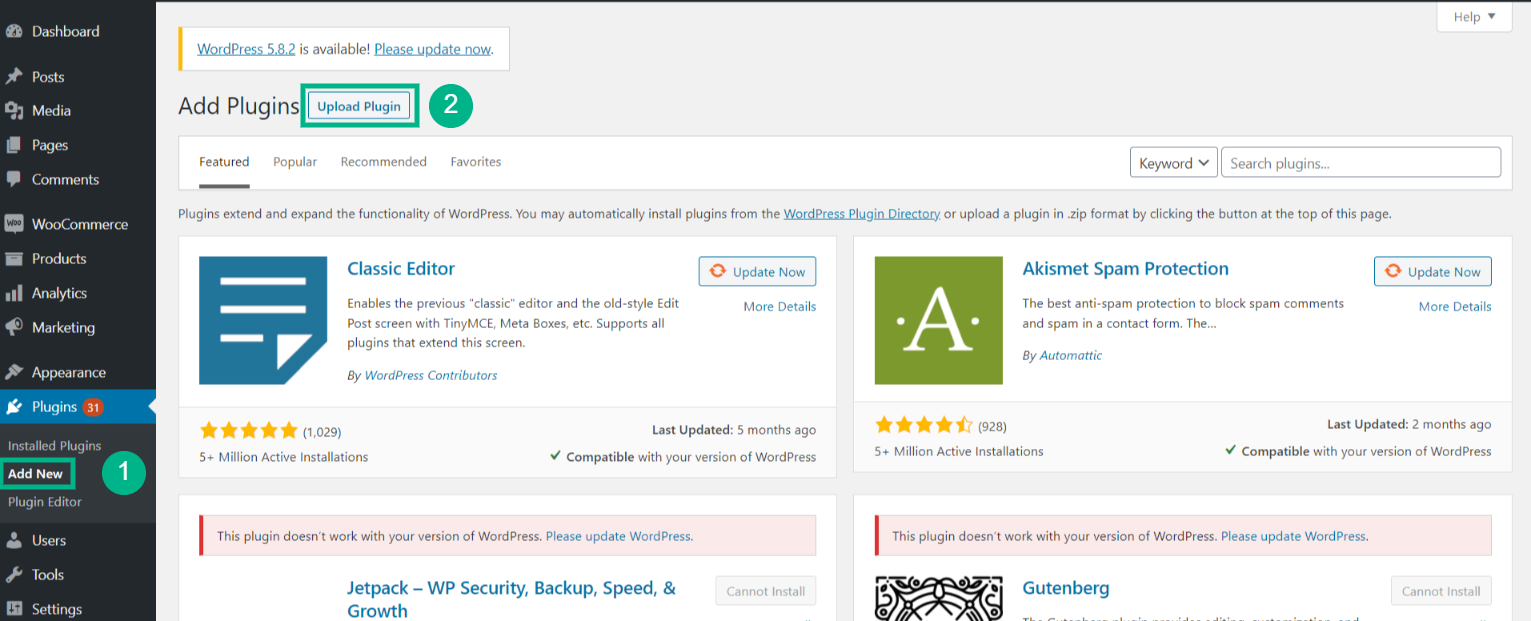
The plugin can be installed like any WordPress plugin (the plugin can be purchased from the ELEXtensions website). To know how to install the plugin, please check our article How to install and set up a WordPress WooCommerce plugin.
The plugin settings can be accessed once the plugin is installed and activated.
WooCommerce > Settings > Request a Quote
Step 2 – Configuring the Request a Quote Button and Page
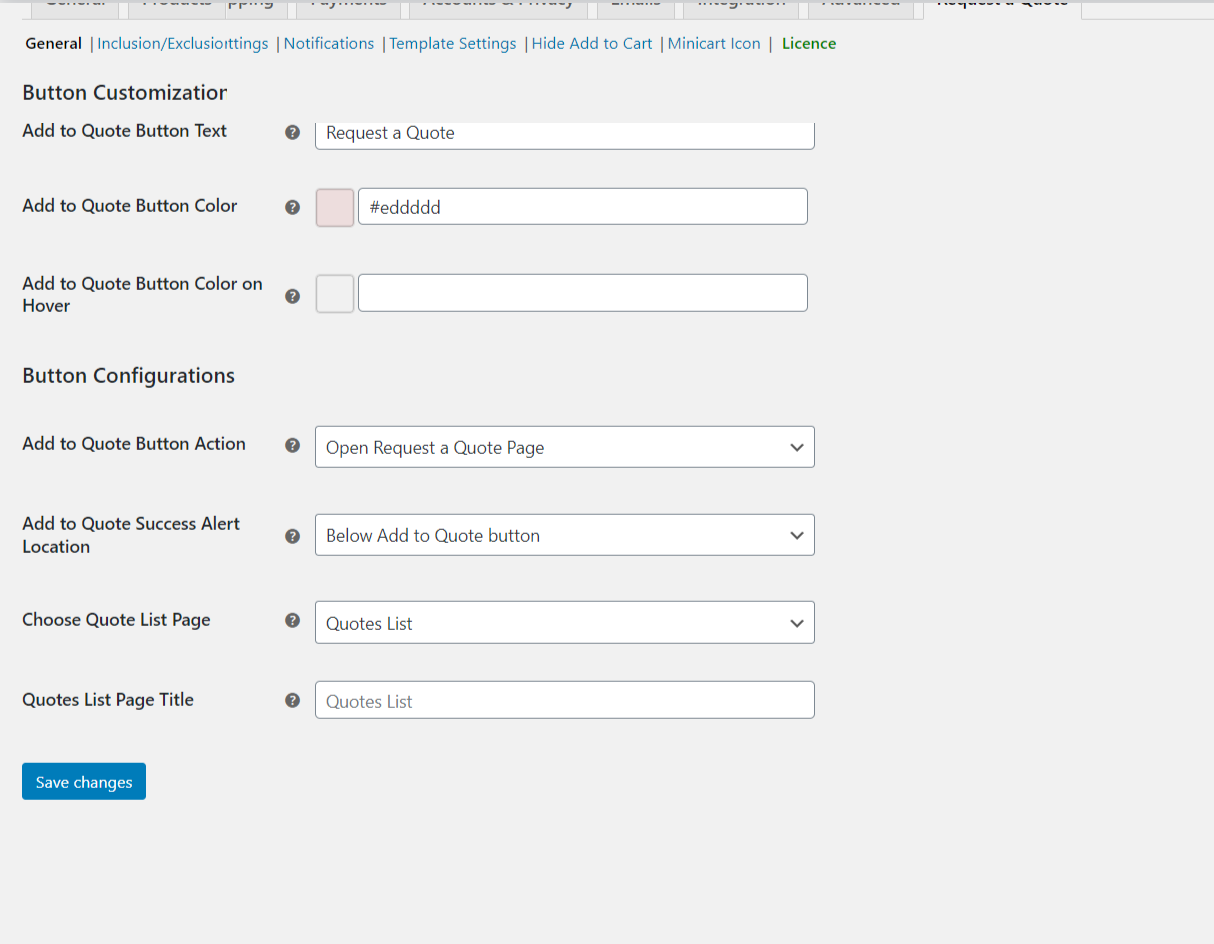
The Request a Quote button can be configured the way you want it displayed on the page. Along with that, the ‘Add to Quote’ button can be displayed on a specific page, from which the customers request a quote.
Here are some ways to configure/customize the button –
- Custom text can be added to the ‘Add to Quote’ button
- A color can be chosen for the button
- Button action can be specified, such as opening the quote list page on clicking the button or displaying the quote list in a lightbox
- Location of the alert display when a product is added to the quote list can be customized (can display it on top of the page or below the Add to Quote button).
- A page for displaying the quote list can be chosen with the header specified.
Step 3 – Customizing the Quote List Form
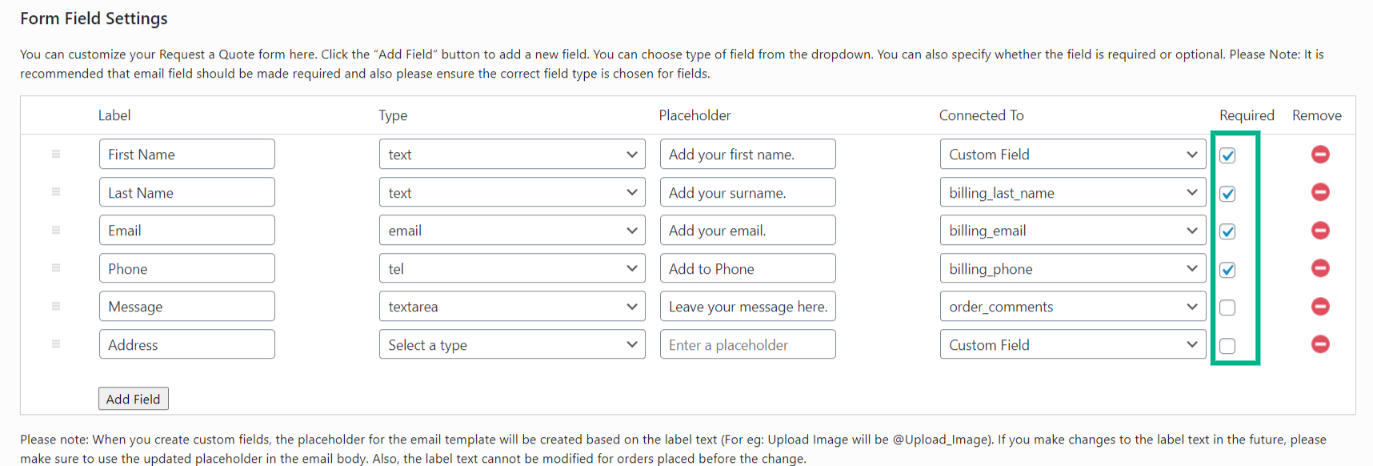
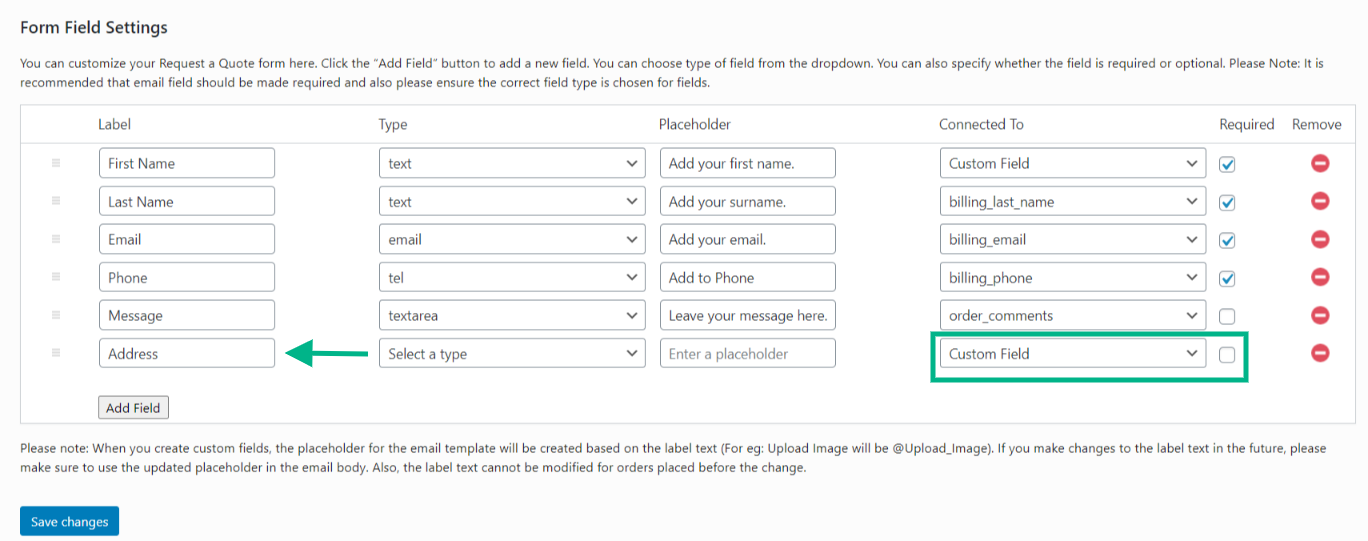
Once the products list page has been specified and displayed, the next step is to collect customer data, such as their name, address, email ID, etc. The quote list comes with some default fields, such as first name, last name, email ID, phone number, and message. The page can be customized as per your requirement by either adding or removing fields.
In order to add a new field on the form – Click Add Button > Specify the Field Type, Label Text, and Placeholder Text
If applicable, the field (as specified above) needs to be connected to one of the core checkout fields of WooCommerce, else you can go in for a custom field. You can also decide and specify if the field is required or not. Furthermore, the URL to redirect customers after their request is placed can also be specified. This message gets displayed on the page.
Step 4 – Setting Restrictions for the Add to Quote Option
If products or user roles are not preselected, the plugin will enable the Add to Quote button for all the products on the list without any restriction. Hence, it helps to have some restrictions in place so that you have the control on the decisions of your customers. Some advantages of setting restrictions include:
- The special feature of the plugin is that its features can be made accessible to only specific products on the list or to specific users.
- Products can be included or excluded based on their name, category, or tags.
- It provides the option to include or exclude specific users.
- Another good feature of the plugin is that it does not let unregistered users create quote lists, instead they are redirected to the registration page.
- Another amazing feature is that the Add to Quote button can be hidden or displayed based on the stock status.
Step 5 – Setting up Notifications
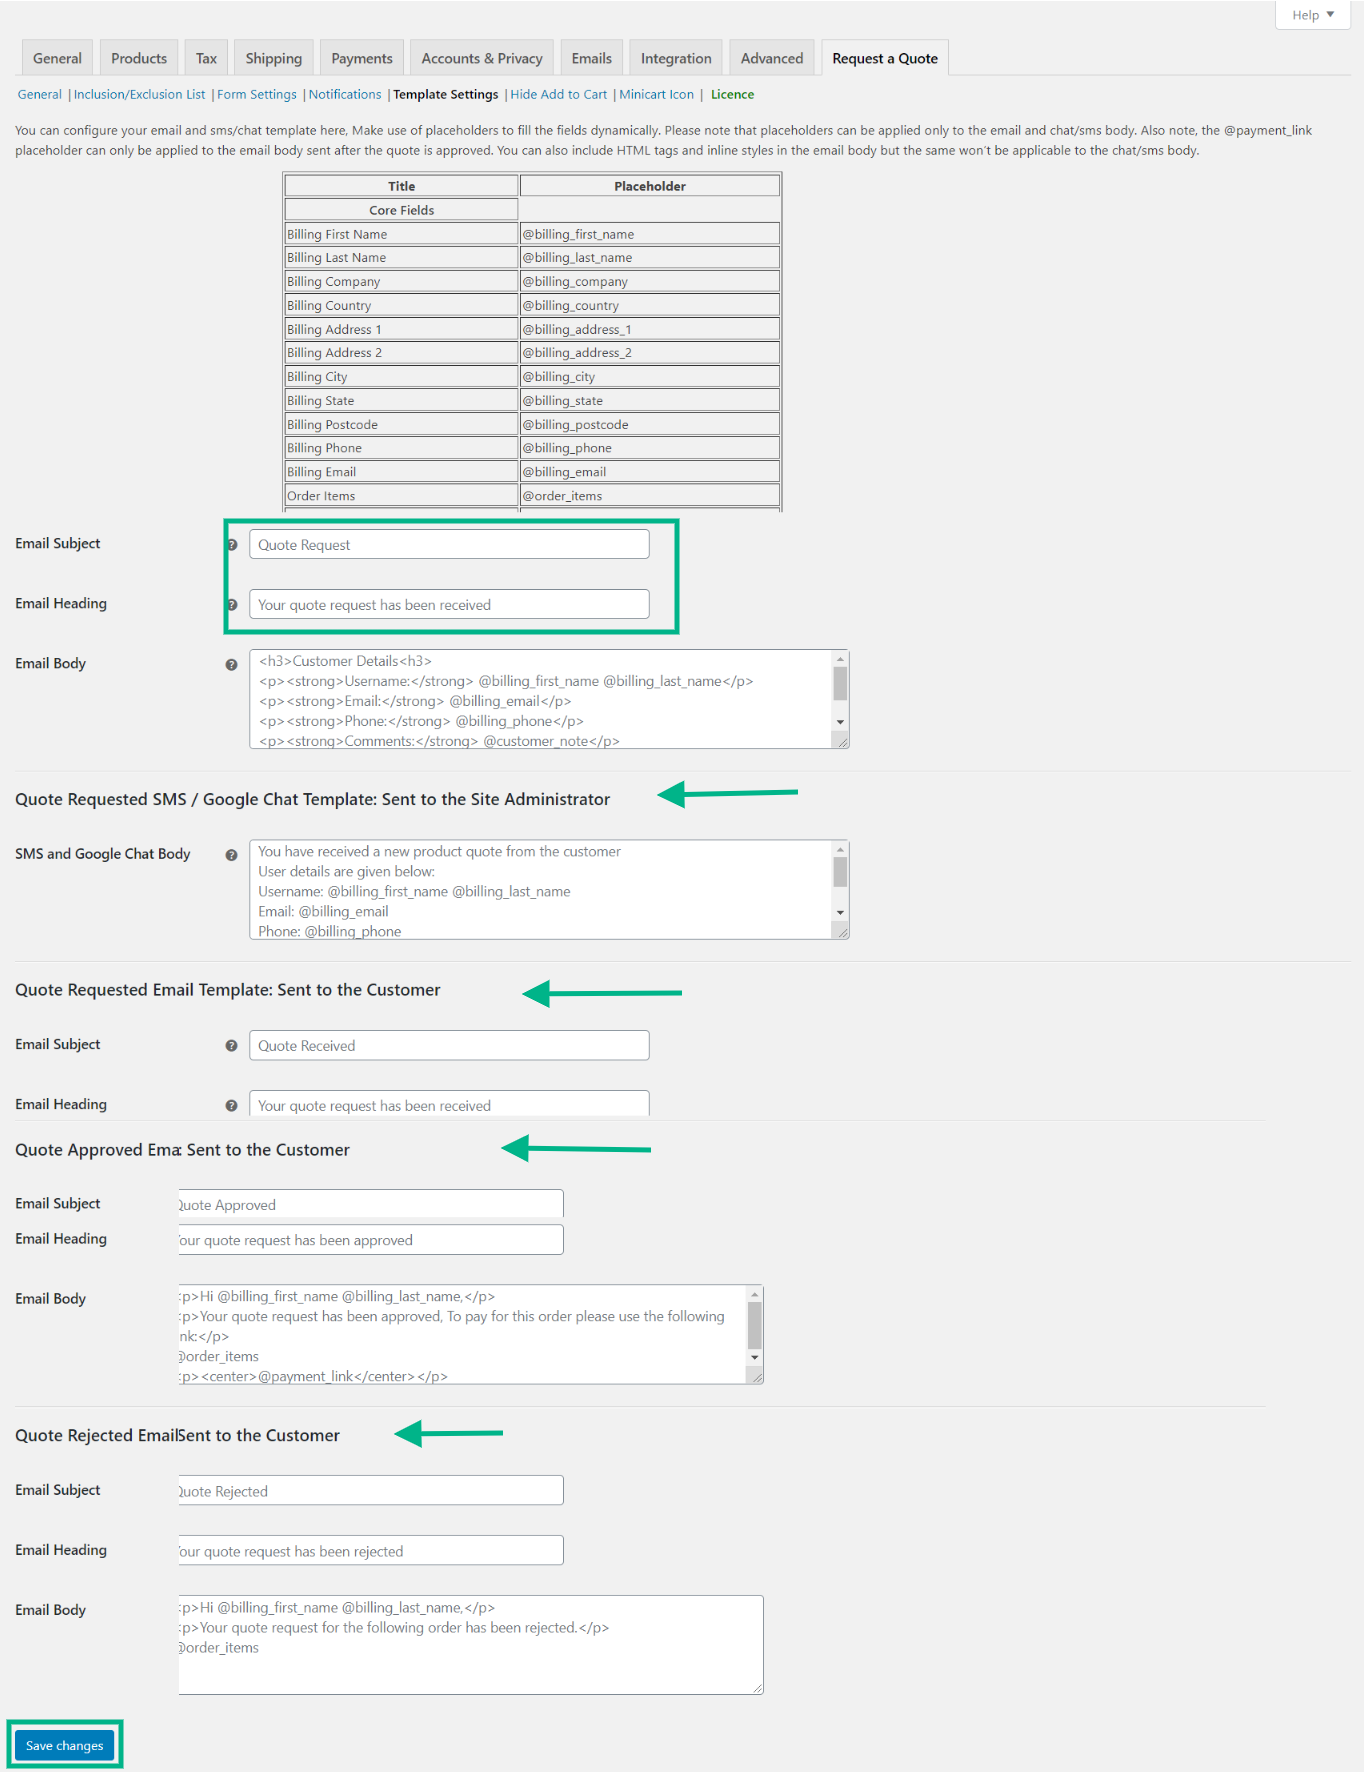
Notifications are an integral part of your eCommerce store, especially when you are offering the request a quote option to your customers. As the business owner or as store admin, you need to get notified when a request for quote is placed and similarly the customer needs to be notified via email when the request is fulfilled. The notifications can be customized based on the situation, wherein the quote is either approved or rejected. On approval, a payment link can also be included in the email notification. While email notifications can be for your customers, you or your store admin can get notified via SMS and Google Chats, along with emails.
Note: The notification template can be customized (under template settings) with the help of the dynamic placeholders that are unique to the quote request form fields.
This detailed article should be able to help you add and customize the Request a Quote button on your WooCommerce store without much hassle. Good luck with the installation and customization of the plugin.
Conclusion:
A WooCommerce ‘Request a Quote’ button gives businesses flexibility and growth options because the pricing structure may be tweaked to fit your needs. Furthermore, it assists your store in selling unique products with custom packaging and providing a pricing based on the material and other criteria employed in the product’s fabrication.
Further Reading:
How to set up a WooCommerce Product Feed in XML files?
Easily Enable ‘Add to Quote’ Button in your WooCommerce Store in 5 Simple Steps

