What can we help you with?
Create WooCommerce Shipment Part Today and Part Later for a Single Order
This is a business case from a customer where he had products that take time to prepare to get it ready for shipping, and he also have products that are already ready for shipping. So he wanted to ship the products that’s already ready and ship the other products later, once they are ready for shipping.
Consider he has Product A (ready for shipping) and product B (under preparation) in the same order and he wants to ship product A first and ship product B later maybe after 3-4 days. The problem he faced with this case was, when the packages are generated, it includes both the product weight and dimension. And, also for the international shipments, it will show that even product B is in the package since the commercial invoice is based on the items present in the order. All this means, he could get into trouble and also pay more for shipping labels.There are different approaches to achieve this business case. This article will give you details on each method, and depending on the shipping plugin you’re using and which suits you best, you can choose any of the method in achieving this.
This case is applicable for the following plugins:
- ELEX WooCommerce DHL Express / eCommerce / Paket Shipping Plugin with Print Label
- ELEX WooCommerce Australia Post Shipping Plugin with Print Label & Tracking
- ELEX WooCommerce USPS Shipping Plugin with Print Label
- ELEX Stamps.com Shipping Plugin with USPS Postage for WooCommerce
- ELEX EasyPost (FedEx, UPS & USPS) Shipping & Label Printing Plugin for WooCommerce
The first method – Edit Order Method:
In this approach, you can Edit the order by placing the order ‘On hold’ and remove items. You can temporarily remove the item you don’t want to ship at the moment, and generate package again and create the shipment. This will create shipment only for the current item on cart and the commercial invoice will have only this item listed on the invoice, and you can add the item to the order again that needs to be shipped later. And when that item is ready to be shipped, you can remove the item which was already shipped and create the shipment, and add the item to the order again (once the second item is shipped). This will all work fine but its a lot of process to follow and if you have many orders, this will take time.
The screenshot below shows how the package details appear before editing the order: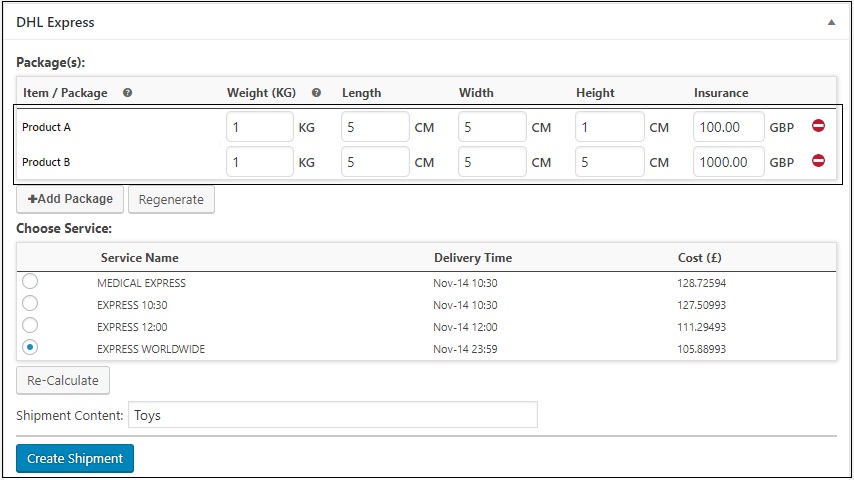
After removing the Product B from the order, you’ll get a single package with Product A in it.
With this method, you’ll have the final label only for product A and even the commercial invoice will show only product A. and you can repeat the process when Product B is ready to be shipped.
The Second method – Editing the package weight and dimension
Please note this method will not work for International shipments since the second item that’s not actually in the package will still be listed in the commercial invoice. You can use weight based packing or ‘pack into boxes with weight and dimension’, and depending on the product weight and dimensions it will bring up the default package details. So if you’re shipping only Product A you can edit the package details such as weight and dimension of the package and click the Create shipment button. If there were two packages created for the order, most of our plugins don’t have the option to remove default packages so you can change the packing option to weight based shipping to get only one package. And before creating the shipment you can edit the weight and dimensions of the package and click the Create shipment button directly. Note that if you click on Recalculate or Regenerate packages options, it will bring up the default package details once again.
The screenshot below shows the package detail with Product A and B using weight based packing.
You can manually edit the weight and dimension of the plugin by default. Weight based packing will only show the package weight so you can manually add only the weight of product A and give the dimension of the box used for packing that product.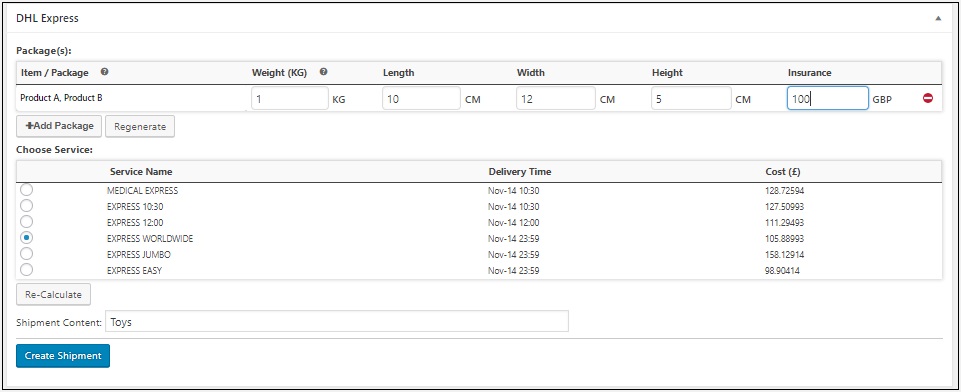
The third option – Code snippet to exclude the product ID from packaging
Below is the code snippet that you can use. It’s mainly for DHL, but we can add filters to our other shipping plugins as well upon request:
The first code snippet is to skip products from packaging by using the product ID.
function skip_products_from_dhl_rates($skip = false, $product, $package){
$shipping_products = array('1879'); // array of Product ids to exclude from cart
$product_id = $product['data']->get_id();
if(in_array($product_id, $shipping_products)){
$skip = true;
}
return $skip;
}
add_filter('wf_shipping_skip_product_from_dhl_rate','skip_products_from_dhl_rates',10,3);
This second code snippet is to skip products from packaging by shipping classes. so you can use either of the code snippets.
add_filter('wf_shipping_skip_product_from_dhl_rate','skip_my_products',10,3);
function skip_my_products($skip = false, $product, $package){
$shipping_free_classes = array(23); // array of shipping class ids to exclude from cart
$shipping_class = $product['data']->get_shipping_class_id();
if(in_array($shipping_class, $shipping_free_classes)){
$skip = true;
}
return $skip;
}
How to use the code snippet to achieve the current business case?
You can add the product ID or class of the product you don't want to ship yet into the code snippet and add the code in functions.php in the theme folder or in Code snippet plugin's _>Add new snippet. Now go back to the order and click on Regenerate packages. You'll see that the package was generated only for one product, so you can create shipment and it will only create package for the item listed in the Commercial invoice as well. So when you want to ship the other item later, you can add the product ID/shipping class of the other item in the code snippet and generate package and create shipment,
The best solution would be to use shipping classes, and add all products that's ready to ship in one class and the other products that takes time to prepare and ship in another shipping class. Assign the products with shipping classes accordingly. Install the code snippet plugin and add two sets of the code snippets one with the 'Ready to ship' shipping class and the other with 'pending shipment' shipping class and activate only one at a time depending on which item you'll be shipping at the moment.
Define a shipping class in WooCommerce > Shipping > Shipping class.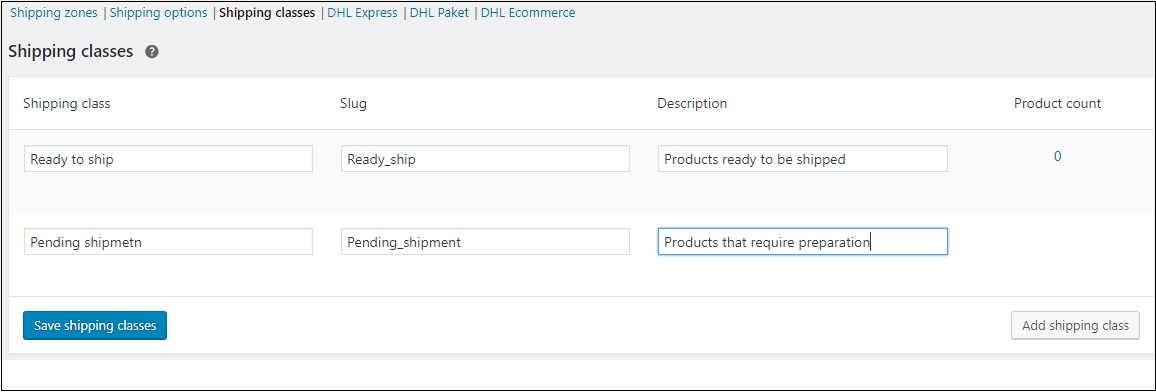
Screenshot below shows where you can assign the shipping class in the product. You can edit the product and under the shipping tab choose the shipping class as shown below.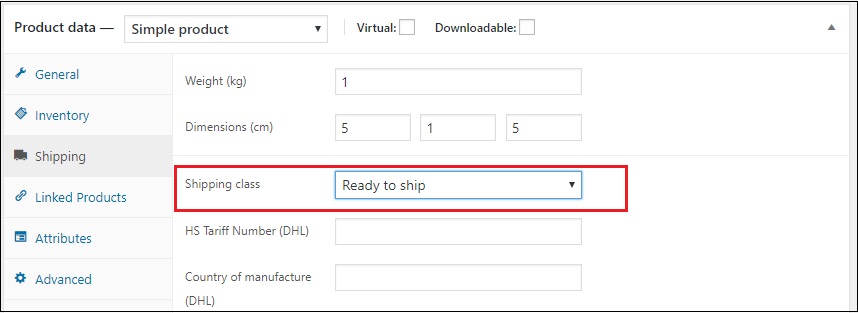
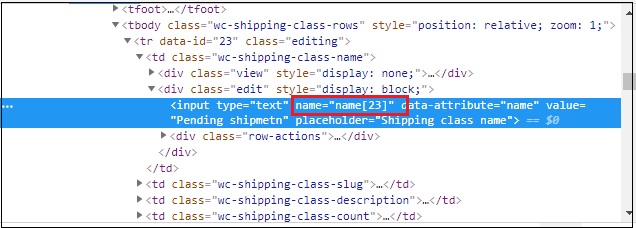
If you're wondering how to get the class ID and the product ID to use in the code snippet it's pretty easy. Edit the product and on the browser url you'll see the post ID (which is the product ID).![]() To get the shipping class ID, click on edit class, and right click on the class name and click on inspect, and on the inspect elements the shipping class name with show with the ID in angled brackets.
To get the shipping class ID, click on edit class, and right click on the class name and click on inspect, and on the inspect elements the shipping class name with show with the ID in angled brackets.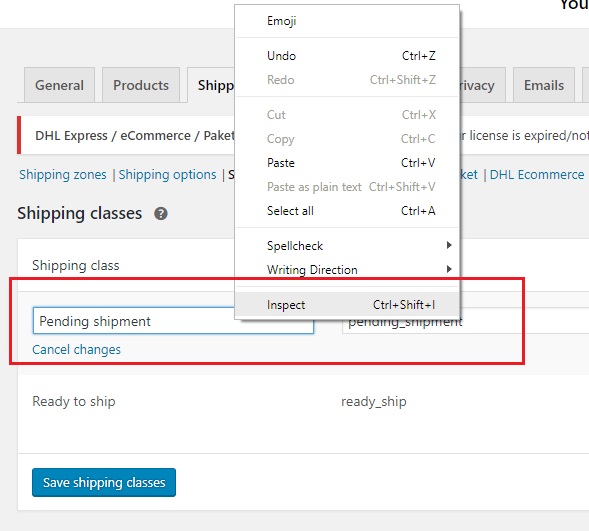
So these three different methods can be used to achieve the same business case, but depending on which solution is more applicable and easy to use for your requirement you can go ahead with one of the solutions. Not all solutions will work for all plugins, so you can choose which works for your case. If you have any request or issues do feel free to get in touch with our support team by raising a ticket here.
To explore more details about the plugins, please check out the product pages.
- ELEX WooCommerce DHL Express / eCommerce / Paket Shipping Plugin with Print Label,
- ELEX WooCommerce Australia Post Shipping Plugin with Print Label & Tracking,
- ELEX WooCommerce USPS Shipping Plugin with Print Label,
- ELEX Stamps.com Shipping Plugin with USPS Postage for WooCommerce,
- ELEX EasyPost (FedEx, UPS & USPS) Shipping & Label Printing Plugin for WooCommerce
You can also check out other WooCommerce and WordPress plugins in ELEX.