This article explains the step by step process to configure FedEx Express saver for WooCommerce. To integrate WooCommerce FedEx shipping methods and services we will be using the ELEX EasyPost (FedEx, UPS & USPS) Shipping Method Plugin for WooCommerce. Moreover, this plugin can not only help in integrating FedEx shipping but also UPS and USPS as well.
The EasyPost API is a robust and highly configurable Shipping API that makes adding shipping services and products to WooCommerce very easy. Moreover, the plugin makes use of this plugin to seamlessly integrate shipping methods and services from FedEx, UPS, and USPS.
About FedEx Express Saver:
The FedEx Express Saver is a great shipping service that is great for WooCommerce shipping. Additionally, FedEx Express services are used to deliver packages quickly and often employs airplanes in the fulfillment process. While FedEx overnight services are the flagship services in the U.S, FedEx also offers two and three-day shipping service. The least expensive version is the FedEx Express Saver service.
The benefits of FedEx Express Saver for WooCommerce are as follows:
- Delivery in 3 business days to businesses by 4:30 p.m. and to residences by 7 p.m.
- Monday through Friday service with Saturday pickups costing extra.
- Available to and from all states in the US except Alaska and Hawaii.
- Can avail Saturday Service, Delivery Signature Options and Hold at FedEx Location.
Prerequisites:
To integrate WooCommerce FedEx shipping services, you will need an EasyPost account as well the ELEX EasyPost (FedEx, UPS & USPS) Shipping Method Plugin for WooCommerce installed and activated. Read this article on installing and activating ELEX plugins on your WordPress site if you need more information.
From your EasyPost account details section, you will need to copy an API Key. There’s a test key to try out the features and a Production Key for live websites.
Integrating WooCommerce FedEx Shipping:
The steps to be followed to integrate WooCommerce FedEx shipping are as follows:
Step 1: Access plugin settings:
Access the settings of the plugin from:
WordPress Dashboard > Plugins > Installed plugins > ELEX EasyPost WooCommerce Extension > Settings.
Or from:
WooCommerce> Settings> Shipping> EasyPost.
Step 2: Link EasyPost Account with the Plugin:
In the General Settings tab, choose the API Mode. If you wish to test out the features before using for live shipments, set the mode to Test and paste the Test API key from your EasyPost account.
When you’re ready to print shipping labels and pay postage for your WooCommerce FedEx shipping, you can switch the mode to Live and use the Production Key.
Step 3: Choosing a Shipping Carrier(s):
In the Rates & Services tab, you can pick up to three shipping carriers to integrate into your WooCommerce shipping. To enable and configure FedEx Express saver for WooCommerce, select FedEx in the EasyPost Carrier(s) field. This will let you pick and choose among WooCommerce FedEx shipping services.
Step 4: Configure Rates & Services:
In the Rates & Services tab, you will have to first give the address for shipping rates calculation.
Next, enable Estimated Delivery Dates for the Shipping Carrier you picked in the previous step. Ticking the checkbox will then enable the service days and the cut-off time used in the calculation of Estimated Delivery Dates.
ELEX plugin also gives you the ability to configure a Fallback rate. This rate is displayed to customers in case the EasyPost servers are unable to return the live rates for some reason. Additionally, you need to pick the type of rate: Residential or Commercial.
Step 5: Configure Label generation:
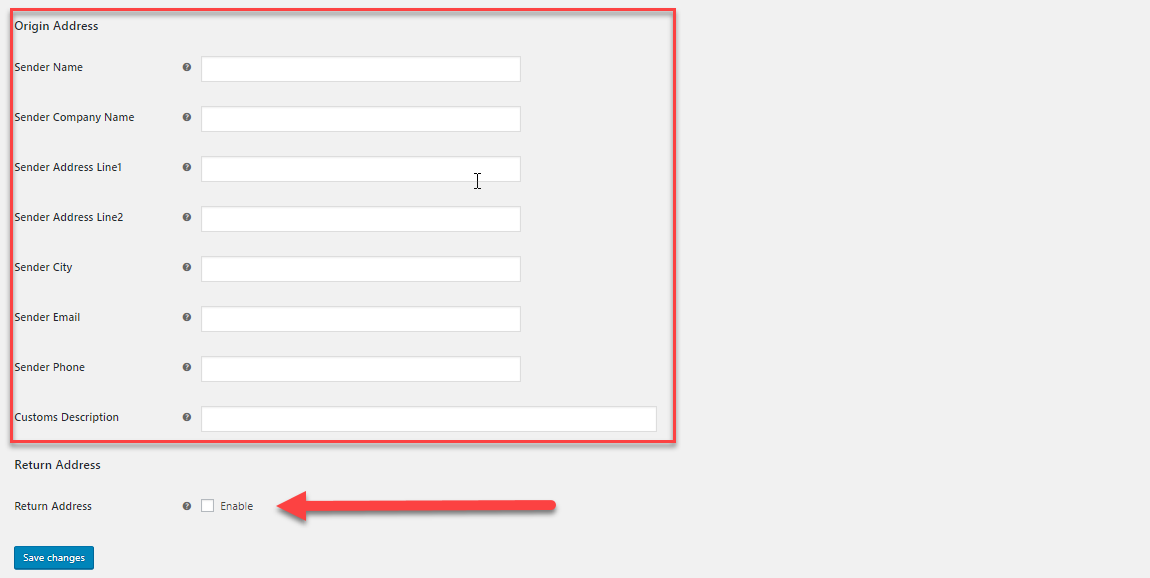
In the Label Generation tab, you will need to fill out the Origin Address. In all generated shipping labels, this address will be mentioned as the Sender Address. Moreover, you can use this to mention a different address than the one you mention when configuring WooCommerce shipping.
Additionally, you can even choose to enable a different Return Address than the Origin Address. What’s more, you can even choose to give a general Customs description using the Customs Description Field.
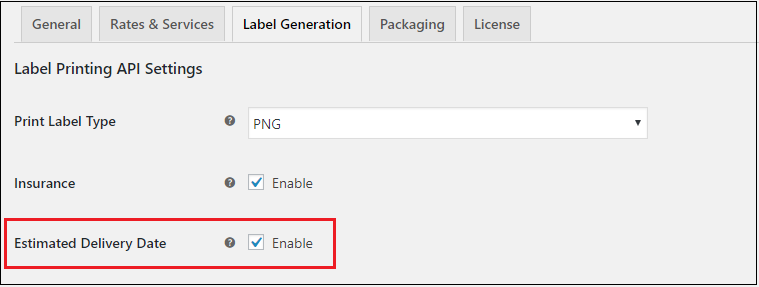
Next, choose the format of the generated label. The plugin lets you choose from five different types of formats for this purpose.
Step 6: Insurance:
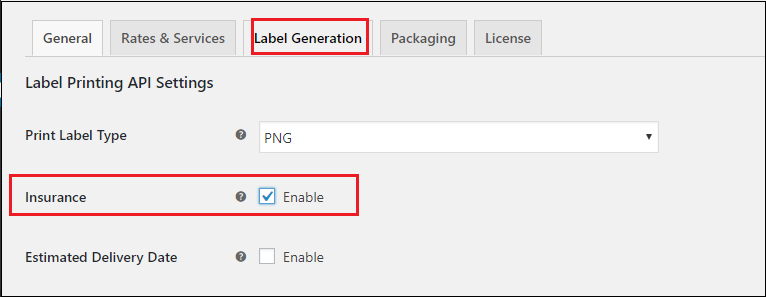
ELEX EasyPost (FedEx, UPS & USPS) Shipping Method Plugin for WooCommerce gives you the ability to enable EasyPost Shipping insurance for your customers.
Moreover, you can choose between letting customers opt for shipping insurance or make it mandatory for all products shipped through WooCommerce FedEx shipping services and methods.
Step 7: Configure Packaging:
The plugin also comes with three packaging methods that you can choose from:
The first method packages every item in your order in its own individual parcel. While the second option packs items based on the weight, the third option packs the items into boxes based on the item weight as well as dimensions.
Once these steps have been followed, WooCommerce FedEx shipping services will be enabled on your site.
Configuring FedEx Express Saver:
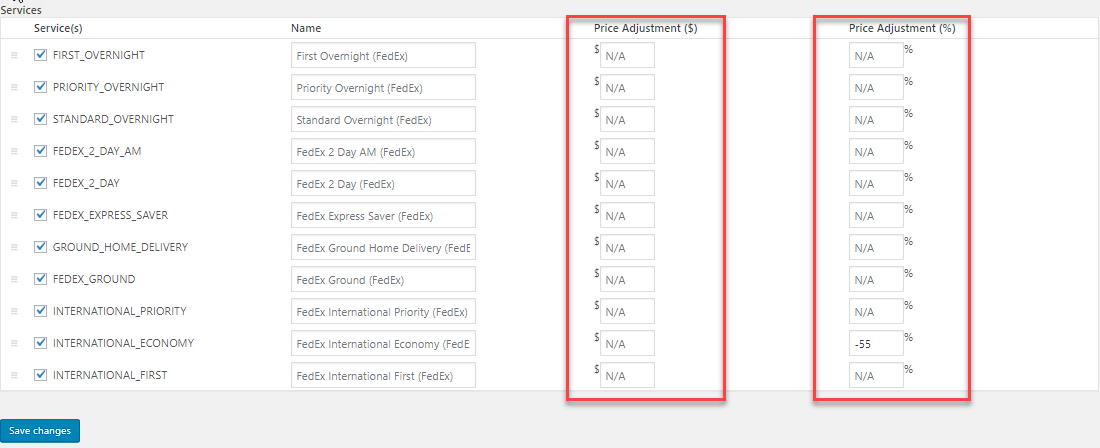
When we select our Shipping Carrier using the EasyPost Carrier(s) field, all shipping services from that carrier will be integrated into your WooCommerce. When you choose FedEx, WooCommerce FedEx services will be activated. This includes the FedEx Express Saver service as well.
What’s more, these WooCOmmerce FedEx shipping services are fully adjustable. The plugin provides fields by which you can choose to increment or decrement the price of these services. Moreover, you can do this with a fixed amount or a percentage.
So you can use the plugin to fully adjust the rates of WooCommerce FedEx shipping services to account for shipping or giving special discounts.
Conclusion:
This is how you can enable and configure FedEx Express Saver on WooCommerce. The ELEX EasyPost (FedEx, UPS & USPS) Shipping & Label Printing Plugin for WooCommerce is the perfect tool to integrate UPS, USPS, and FedEx into WooCommerce. You can find more information about the plugin and a breakdown of its features here. To download and test the plugin out for free, you can visit this page.


