Searching and shopping online – it is interesting, right? We all are interested to do it, and simply crazy about it! And as a shop owner, you want to know how to increase sales on Google Shopping!
What we will do, when we want to buy a product online? We may go to Amazon, eBay, etc. And before getting into those online shopping sites directly, we go to search it on “Google Shopping”! And yes, we all go to this Google’s online marketplace because we need more choices for a product we are searching for.
When we think in the opposite direction, it is the most powerful market for retailers or shop owners to market their products. As a shop owner, you can display your products on Google shopping as it links to your WooCommerce store!
If you are already advertising your product in Google shopping, you are in the track of driving more sales to your shop. If you are not yet entered into this track, you are in the right place! Let us discuss how to get displayed your products on this powerful market and uplift the traffic to your store.
Before getting into that, let us go through what is Google Shopping and why it is needed briefly.
What Is Google Shopping And Why You Should Use Google Shopping For Your Store?
When it was released in 2002, its name was “Froogle ”. Interesting, right? Simply, we can say it is a Comparison Shopping Engine (CSE). As Google lists your sites in SERP, here it lists your products in its Shopping SERP. But the difference is, it doesn’t take the keywords entered by the user and lists the text based Google Ads, it takes product data uploaded by Google Merchant center to list these product ads when a user searches for a product.
As it is an advertising platform, it is a branch of Google Adwords. We use it to search for a product on it for buying or comparing the products by different retailers. It lists products as thumbnails with the product name, price, and the shopping site name. You can even sort and apply some filters to display the relevant products to you.
As an online shop owner, it is the most potential market place where you can market your products. So it is your responsibility to reach your products in front of them. Now let us see how your products will reach your potential customers with an example.
Example: Suppose I want to buy a Nike running shoe, so I will search it on Google shopping as “Nike running shoes for women”. The reason why I am searching here is, I need more choices. If I go to one particular WooCommerce shop, maybe I can’t find the one which is in my mind! Or I need to search more to find that one. But I know that I can find the shoe in my mind easily if I go to Google Shopping and directly go to the shop which sells that shoe.
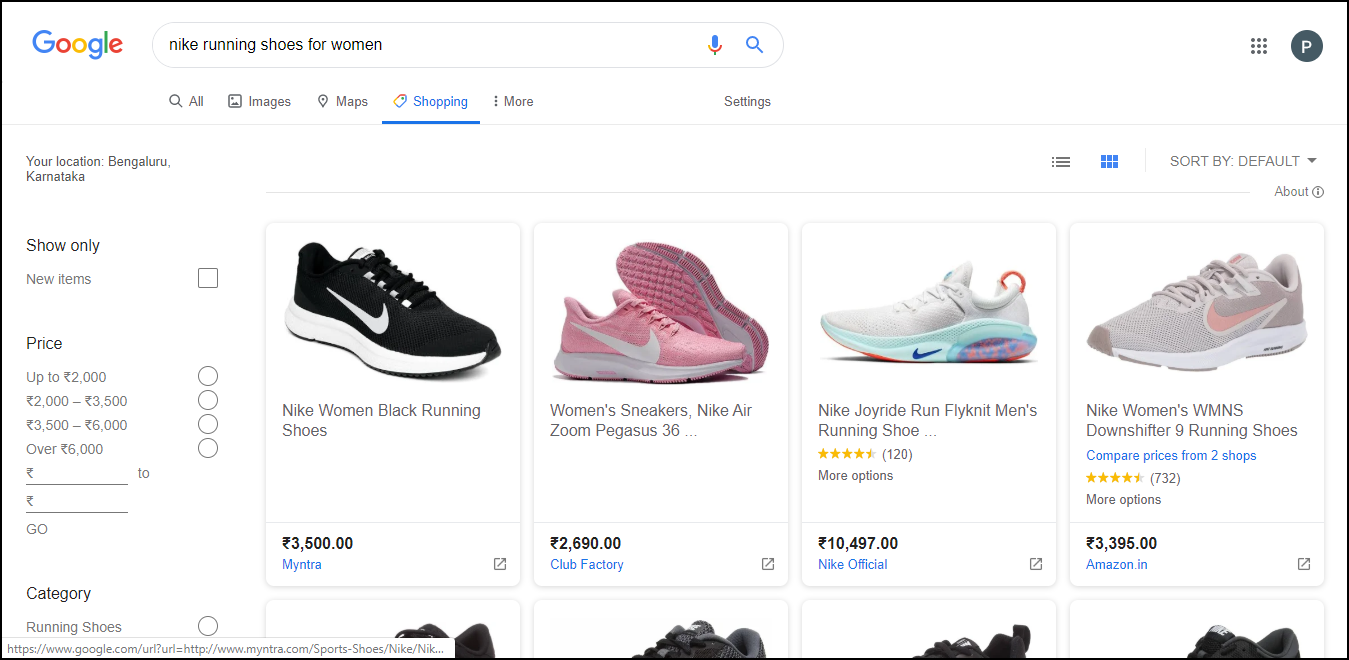
So yeah! This is why people love searching for products on Google Shopping. We can compare and find the one which we like and directly go and get it!
It is clear that you can drive more sales by listing on it. Because it has a visual impact. Users can easily catch the products and, when they click on the thumbnail of your product, you are getting more traffic to your site. As a result, your site will gradually be pushed to the first ten ranks of Google SERP. It is proven that Google Shopping ensures a 30% conversion rate! Interesting?
But the question is, how to get displayed your products on Google Shopping. It is a step by step process which incorporates Google Merchant Center, Google Adwords, and Google Analytics.
Google Merchant Center is to take your product details to Google Shopping, Adwords is to make the ad campaigns and display the advertisements and finally, Analytics is to check the performance and traffic of your campaigns.
The steps are,
- Setting Up Your Google Merchant Account
- Create Your Product Feed
- Link With Your Google AdWords Account
- Create Shopping Campaign
- Create Ad Groups
These are the steps we should follow to create the ads of products on Google Shopping. So let us start with the Google Merchant Center.
1. Setting Up Your Google Merchant Account
The first step is to sign up to a Google Merchant Center account to get your products featured in Google SERP and Google Shopping search results.

As you can see, it has a simple and user-friendly interface and anyone can work on this Merchant Center without any doubt because of its easy navigating nature.
In simple steps, you can set up your Google Merchant account. Here they are,
1. Add Your Business Information
Add your business country, business display name and time zone to start.

2. Accept Terms and Conditions
After that, read the terms and conditions and click on the checkbox “I agree to Merchant Center Terms and Conditions.”

Click Continue.
3. Choose The Program Which You Want
This step is optional, you can either skip it here or select the checkboxes from there itself.
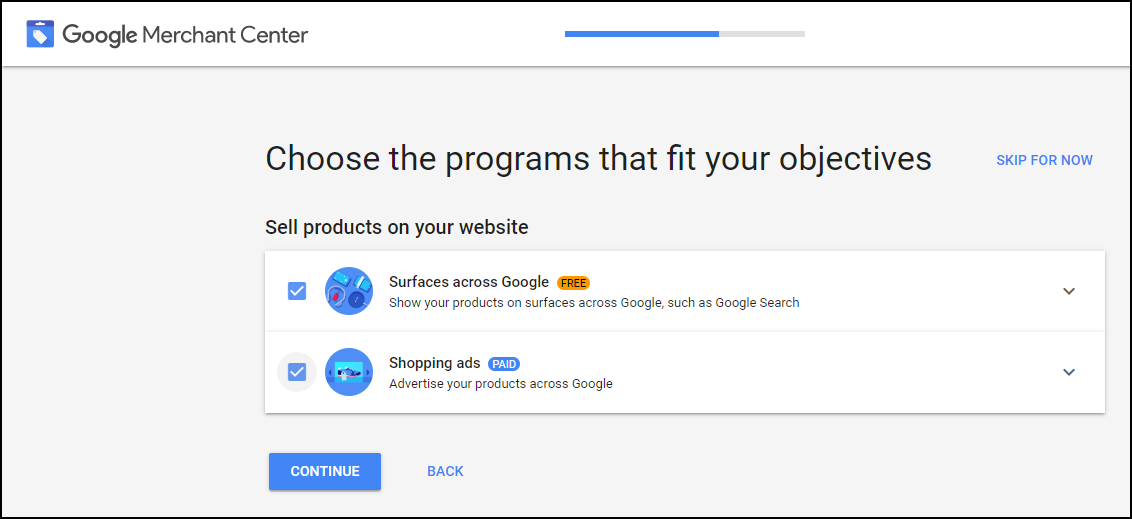
You can select Surface across Google option to show your products in SERP and Shopping ads for advertising products in Google. The latter is paid. Then click “Continue”.
4. Review And Create Your Google Merchants Account
Here you can review your account details and create the account.

5. Account Created!
Yes! Your Google Merchants account is created.

Then what is next?
Yes, let us move on to the next step.
2. Create Your Product Feed
This is the crucial part of adding your product on Google Shopping! You should inform and feed your products and their information to Google for displaying it to your potential customers, right? For that, you have to create the product feed. This is as simple as a pie!
We have set up the Google Merchant Center account. Now let us create the product feed from it.
Go to Products -> Create Product Feeds.

After clicking it, a tab will appear to enter your country of sale and language. The demographics of your products will display based on the country and language. Enter and click continue.

Then you can enter a name for your product feed. And you can choose one option among four to set up your feed and connect to the merchant center.
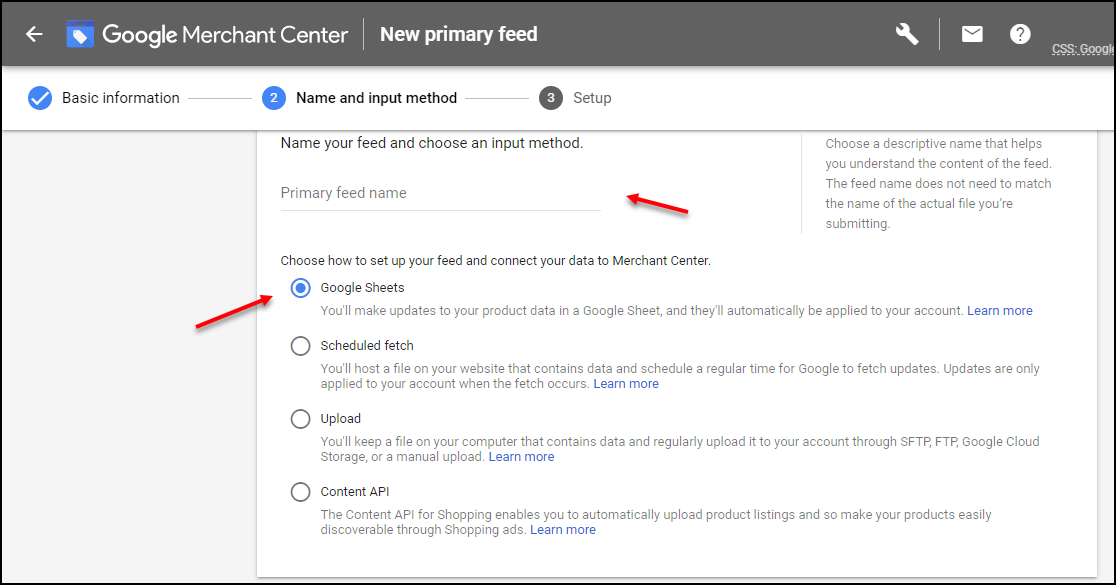
- Google Sheets
- Scheduled Fetch
- Upload
- Content API
If you choose Google Sheets, you can either generate a new template from Google or you can upload your own product feed spreadsheet.

If you choose to generate a new Google spreadsheet from the template,

There you can see the feed name you have already created and an “Open” link under the Google Sheets. You can open it and add the product feed details there. It contains,
id: It is the unique id of each product. Most of the time it is the SKU.
title: Here you can enter the product title. You can add the specifications of the product here as it should match a user query. Eg: “Nike Running Shoe for Women, Black”.
description: Enter a clear description of your products here. Eg: “A pair of women running black shoes with upper Cushioned footbed styled..”.
link: Enter the URL of the page on which a user should be landed while clicking on the “Visit site”. Eg: https://www.amazon.com/
condition: It is an optional value. Only used while selling reused or refurbished products. Eg: used, refurbished.
price: Here enter the price of your product. Eg: $100
availability: You are simply required to inform whether your product is available or not. Eg: “In stock” or “Out of stock”
image link: This is the URL of the product image.
gtin: You can enter the global trade item number of your product here.
mpn: You can enter the manufacturer part number here.
brand: Your product brand name. Eg: “Nike”
google product category: You can enter the Google-defined product category of your product here.

If you want to upload your own spreadsheet, you can add these above attributes as headers and add the details and simply upload it to the merchant center.
In Schedule Fetch, you can host a Google product feed file that contains the details of all your products, and you can schedule it to fetch your products details for Google on a daily, weekly or monthly basis.
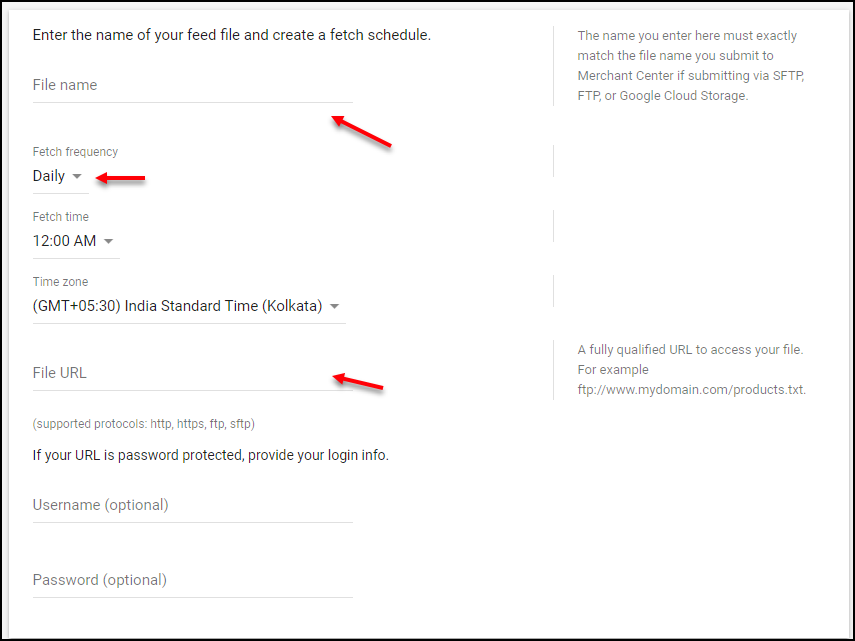
Here, you can add a file name, fetch frequency (daily, weekly or monthly), a fetch time, time zone, file URL and username and password of your URL, if the URL is protected by password. Then you can create the feed.
In the Content API , it helps you to automatically upload your product listings to Google that will help you to reach your products to potential customers through ads.
In Upload, you can upload a feed file from your system that contains the product data. This option is useful if your online store contains a large number of products and it is not practical to enter each and every product detail for individual products.

How Can You Generate Google Product Feed in Your WooCommerce Store?
If your online store sells a huge number of products in different categories, it is difficult to enter all the items into a spreadsheet and upload it to Google. In such cases, you can seek help from a handy plugin that generates Google product feeds from your WooCommerce store. There are many product feed generating plugins available that offer advanced features such as scheduling, creating custom attributes and offering multiple languages for product categories, etc.
In this article, let us take a top-notch Google product feed plugin that offers more advanced features to know how to increase sales on Google Shopping. Let us have a look, how we can create or generate Google product feed using ELEX WooCommerce Google Product Feed – Google Shopping Plugin.
This is a freemium plugin, if your store deals with variable products, you can go for its premium version.
Now, let us start!
Creating Product Feed Using ELEX WooCommerce Google Product Feed Plugin
After activating the plugin, you can go to “Create Feed”, and add the project name and description for your feed, select country, enable “Include Variations” if your store sell product variations, set default Google category if needed as by default it will be mapped to all of your product categories, choose XML/ CSV/ TSV feed file format, choose refresh schedule if needed. You can set the refresh schedule daily, weekly or monthly. If you choose daily, you can enter the time at which the product fetching should be scheduled everyday. If you choose weekly, you can set the days in the week and time to do the schedule fetching and choose the dates and time for the monthly schedule as well. If you have not entered the GTIN, MPN and Brand of any products in the product page, you can enable auto-set identifier as it will create feed for those products “identifier exists” and set it to “no”. Project name and country are mandatory fields here.

You can click Save & Continue.
In the next step, you can map your product categories to Google product categories. So choose relevant Google product categories that best matches your product categories. While choosing the Google product categories, the checkbox corresponding to the product categories will be enabled by default.
Before that, if you want to choose any language such as English, Russian, German, Spanish and French based on the region you are selling your products, you can go to the Settings tab and choose the language. This is for mapping your product categories to Google categories in that regional language.

Then you can map the categories,

After mapping this, you can move on to the next step, which is attribute mapping. There you can map the predefined Google attributes to the corresponding attributes of your products. If you want to create custom attributes, you can go to the Settings tab, and add custom attributes in the text box of “Meta Keys”.

Here, you can choose the product attributes to be mapped to the Google attributes. You can append and prepend the other attributes along with the new attributes as well as you can set conditions to map a particular product.
Append & Prepend

In this example, if you do not want to map the Google Product title attribute simply to your product title, you can prepend the Product Title by space with the Product Description and append the Product Short Description by a comma.
Set Condition
In the “Set Rules” option, you can set conditions to map a product attribute along with AND and OR features.
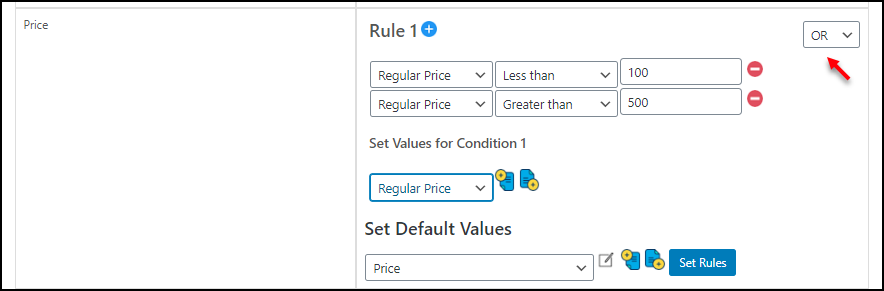
In this, if the regular price of a product is less than 100 or greater than 500, it will map to the Regular Price of those products. If both of these conditions are not satisfied, it will map to the Price of the product default.
Then you can click on “Save and Continue”.
The next step of feed creation is the exclusion of the products. If you need to exclude some products from the feed, you can add the product names on the tab.

Then you can click on the “Generate Feed”. Yes, your feed is ready. Now you can go to the “Manage Feeds” and download your feed. Then you can upload it to the Google Merchant Center. Here, you can find 6 more options rather than “download”. They are,
- Edit: For editing the feed for changes.
- Copy: Generating a copy of a feed.
- Pause Schedule: For pausing the schedule from a refresh for a time period.
- Regenerate Feed: You can use this option if you need a quick refresh.
- View Feed: For viewing of your feed.
- Delete: To delete the feed.
Along with that, you can see the created, modified and next schedule date.
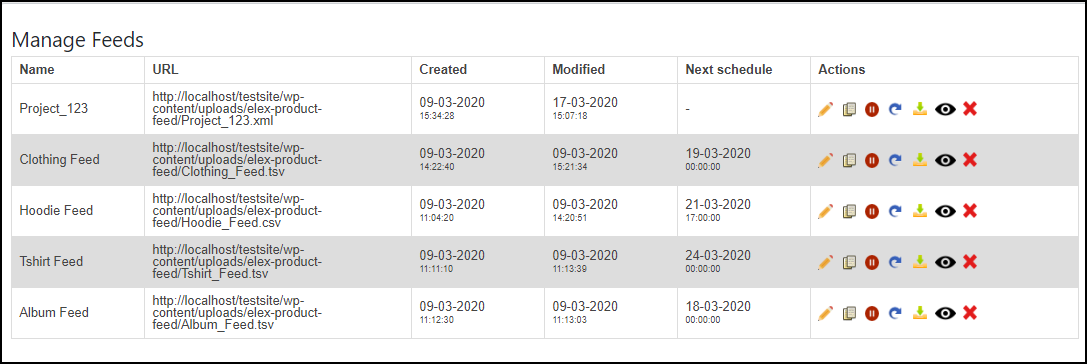
This is how it will look.
After uploading it to the Google Merchant Center, the next step is to link your Google Adwords account.
3. Link With Your Google AdWords Account
In your Google Merchants account, click on Settings -> Linked Accounts and login with a 10 digits Google Ads ID and email address that has the access of admin roles to Both Google Merchants and Google Ads.

Next, move on to Google Ads,
4. Create Shopping Campaign
After linking your Adwords account and Google Merchants account, the next step is to create Google shopping campaigns in Google Ads. This is the main tool to create advertisements of your product in Google Shopping.
Login to your Google Adwords account and create a new campaign.
Go to the campaign tab and click on the “New Campaign”.
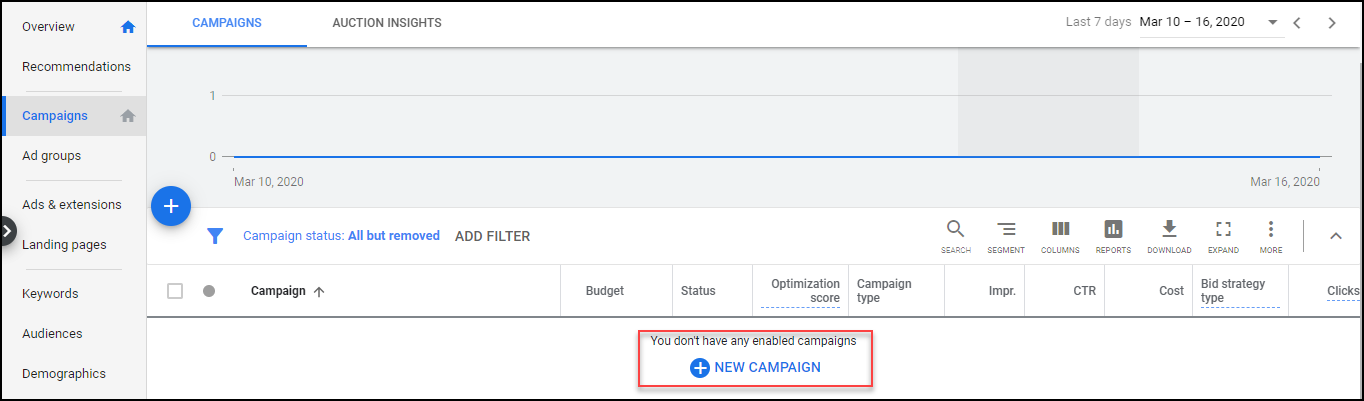
After clicking on that, you will be directed to a new tab where you can choose goals. Here we are creating shopping campaigns. So you can choose Sales, Leads or Website Traffic.
Sales: This goal will help you get more sales through the campaigns.
Leads: This goal will help you to get more leads to your business. That is, it will align your ad accordingly to make the users complete an action for conversion if he or she has clicked on the ad.
Website Traffic: This will help you to reach your site to potential customers and increase the traffic flow to rank well in Google.
After choosing the goal type, you can choose the designation under them. They are, search, display, shopping, video and discovery. In this scenario, I am choosing the “Sales” goal. And whatever goal you may choose, never forget to choose “shopping” as the designation.

Your Google Merchant account displayed under that, and choose your country where you would like to run the campaigns.
And you can choose Standard Shopping Campaign and click “Continue”.
Now, you can enter the campaign details such as your campaign name, bidding and budget and campaign priority.
Campaign name: You can enter your campaign name there.
Bidding: You have to choose your bidding strategy.
- Manual CPC(cost per click): You can set the maximum CPC of your campaign here.
- Target ROAS (return on ad spend): It is an automated bid strategy. It needs conversion tracking to set the most efficient bid for the products.
- Maximize clicks: If you choose this, Google Ads will automatically set the bids to get maximum clicks to your products within your maximum budget.
And you can also enter a maximum CPC bid limit. It will help you to control the maximum amount you will spend for each click on your product ads.
Budget: Here you can add the average amount you wish to spend on a day. But Google manages it on a monthly basis. That is, you will spend only less than the amount of this budget * the total number of days of a month.
Campaign Priority: You can choose the campaign priority among Low, Medium and High. By default it will be low and it is suitable if you run a single campaign.
Targeting: Here it will be already chosen to target on Search Network, YouTube, Gmail and Discover.
Locations: Here you can select the locations to target your campaigns. You can choose all countries and territories, your country or any other country. Also you can set to target the people such as, people who show interest in your targeted location, people regularly in your targeted location and people searching the targeted location. Also you can exclude people in the targeted location or in the excluded locations.

And finally you can enter the start and end date to schedule the campaign. Then “Save and Continue”.
6. Create Ad Groups
Yes, now you can create ad groups. It will decide what types ad and you are going to run and its bidding. There will be 2 ad groups: product shopping and showcase shopping. Product shopping ads are used to advertise a single product. And showcase shopping ads are used to advertise multiple products to build your brand.
If you choose the product shopping ad group enter the ad group name and save. If you choose the showcase shopping ad group, enter the ad group name and choose whether all products should be shown in the ad or selected products. If you choose the selection products, select the products based on the filters.

Save and continue.
The final stage is Google Analytics. This is actually for monitoring the performance of your ad campaigns.
Google Analytics
The final step is to connect your account with Google analytics. So that you can track the performance of your online store and the ad campaigns. In this, you can check your targeted audiences, conversion data, customer engagement data and the traffic coming to your site etc. And also, you can even check the details of leads or single clicks on your site.
So, here, you can use it to check the traffic flow to your site after the running of Google shopping ads. Based on the Analytics report, you can track how it works on your business sales, and based on that, you can change the target location or products to advertise based on the reports.

