Introduction
Now, you might have set up your WordPress /WooCommerce store efficiently and also the various products to sell with proper pricing strategies and secured payment gateways to ensure your store is fully functional. Now the next important thing to be done is to set up shipping on your store. If you see there are plenty of options available to set up shipping on your WooCommerce store.
Shipping is important when you consider selling physical products. To streamline all the shipping processes in your store, you need to ensure you have strategies and methods baselined. WooCommerce offers various methods to implement shipping processes in a smoother way. Let us take a look at how you can implement WooCommerce Shipping.
WooCommerce shipping
When you are setting up a WooCommece store, you can set up shipping details that help you to keep a check on the shipping details. Also upon setting up the shipping date, your store can function effectively. Basically, you can set up shipping options, shipping zones, and even the shipping classes. Upon setting up these, you can effectively run an eStore with effective shipping.
- Shipping zones
- Shipping options
- Shipping classes
General Settings -WooCommerce shipping
In the WooCommerce shipping settings, you can configure what basic settings need to be done to ensure the smooth shipping of your products.
- Base Location: Select the location depending on where you are shipping your orders.
- Selling Location(s): Select the locations to which you wish to sell your products. You can select any one options from the drop-down:
- Sell to All Countries
- Sell to All Countries, Except For…
- Sell to Specific Countries
- Shipping Location(s): Give you the option to select the locations to which you want to ship your products. You can select anyone from the drop-down:
- Ship to all countries you sell to
- Ship to all countries
- Ship to specific countries only
- Disable shipping and shipping calculations
- Default Customer Location: This is the customer location that you want to set as default on your online store. With the data, you can calculate the shipping cost, way before the customers enter the address.. Besides, there are the following options as well in the drop-down menu that you can choose as the default customer location:
- No location by default: Here, the store owner does not set any default location, and hence no taxes are calculated.
- Shop base address: In this option, you can set the base location of your store as the default customer location.
- Geolocate: Determines the customer’s default location based on the IP address through which the customer logs in.
- Geolocate (with the page caching support): Here you can determine the customer’s default location based on the IP address through which the customer logs in. The only difference is that you have to select this option only if your store has a page caching support.
After configuring the settings mentioned, you need to save the settings for your store.
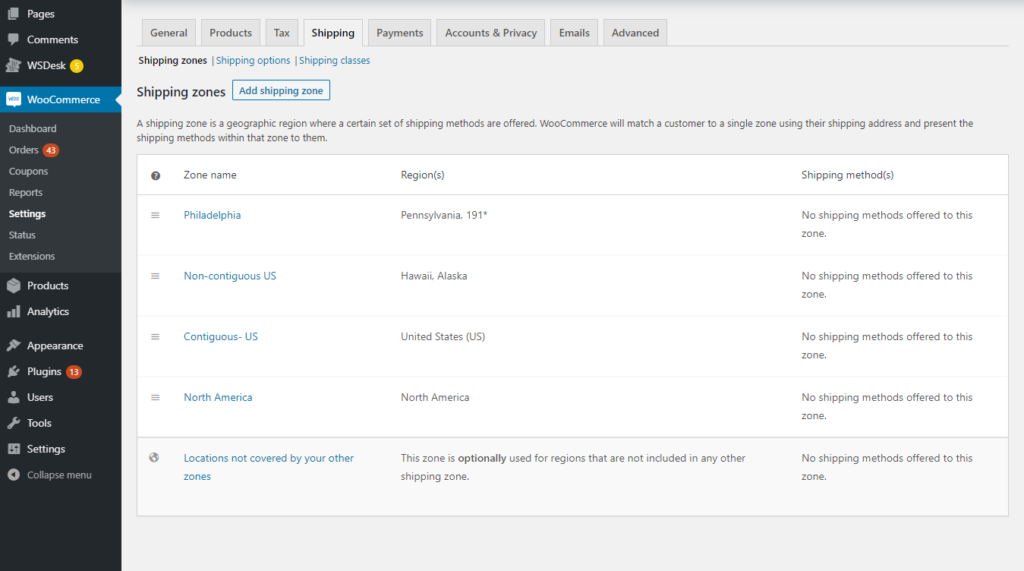
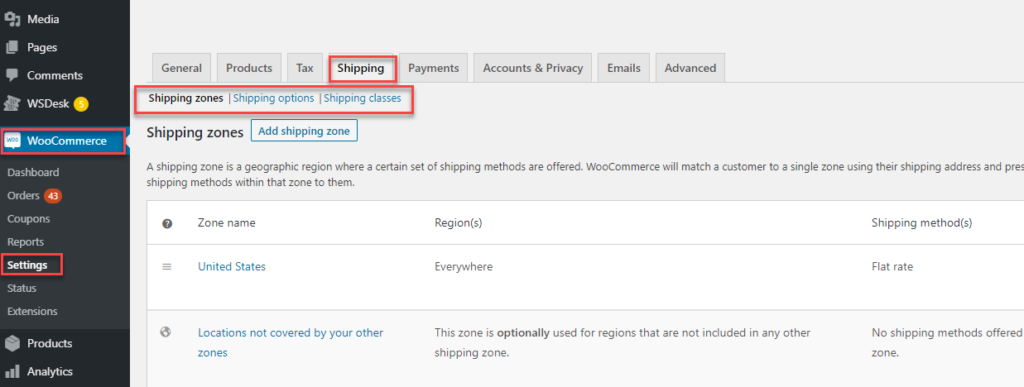
What are Shipping zones?
Shipping zones are geographical areas, where the items are shipped. You can narrow down your shipping zone from regions to zip codes for shipping. It has to be noted that each customer falls into only one zone. Also, each zone can have multiple shipping methods too.
Adding Shipping Zones to WooCommerce Shipping
To add Shipping Zones, you need to follow these steps :
- Go To WooCommerce>> Shipping>>ShippingZones.
- Add the Shipping zone.

- Add the Zone name, then the Zone regions with respect to the Zone name. Regions can be Countries, states or continents.
- If you want to limit to zip codes then you can click on Limit to specific zip codes. For example, you can give zip codes like 90210, etc.
- For each shipping zone, you can also go ahead and add Shipping methods, which is explained next.When you are setting up a WooCommerce shipping zone, then it helps you to offer rates depending on the zone, depending upon the customer matching the zone. With Shipping Zones you can :
- Offer shipping with respect to zones and regions.
- You can even offer free-shipping depending on the zones or with respect to zones.
- It is easy to offer flat-rates with various shipping zones.
- You can easily limit the local pick up to specific zones or even zip codes
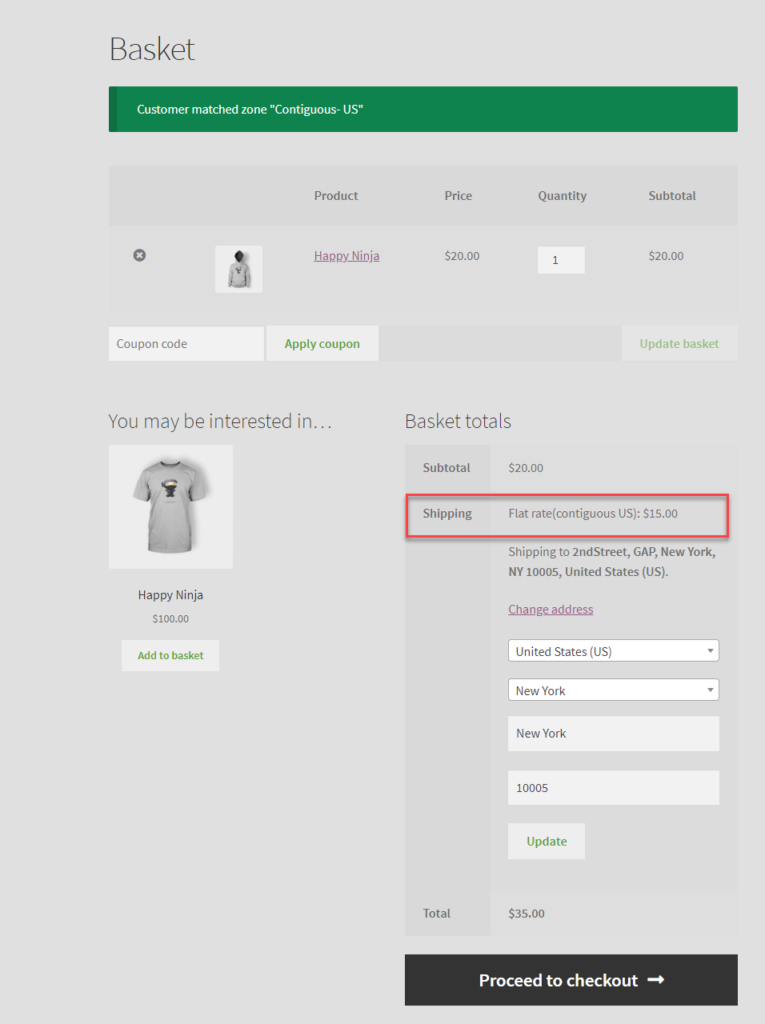
How to match a customer to the zone in WooCommerce Shipping?
Whenever a customer makes a purchase on the WooCommerce store, they are matched to zones given in the WooCommerce shipping. Mostly this matching is done from top-to-down, hence if your customer matches to any zone, then the rates corresponding to the zone, is shown.
Take an example of these zones :
Consider if your customer is from Pittsburg, then first the zone Philadelphia is checked for the zone. If your customer gives a zip code like 1522 or 1867, then the first criteria in the shipping zone are not matched. It is then that the second option on the Non-Contiguous US is then checked, where the regions are Alaska and Hawaii. Finally, when the second options are also not matching, then WooCommerce chooses for the third option ie Contiguous US.
WooCommerce Shipping Methods
WooCommerce lets you, set up shipping on your store using default methods like
- free shipping,
- local pickup and
- flat-rate.
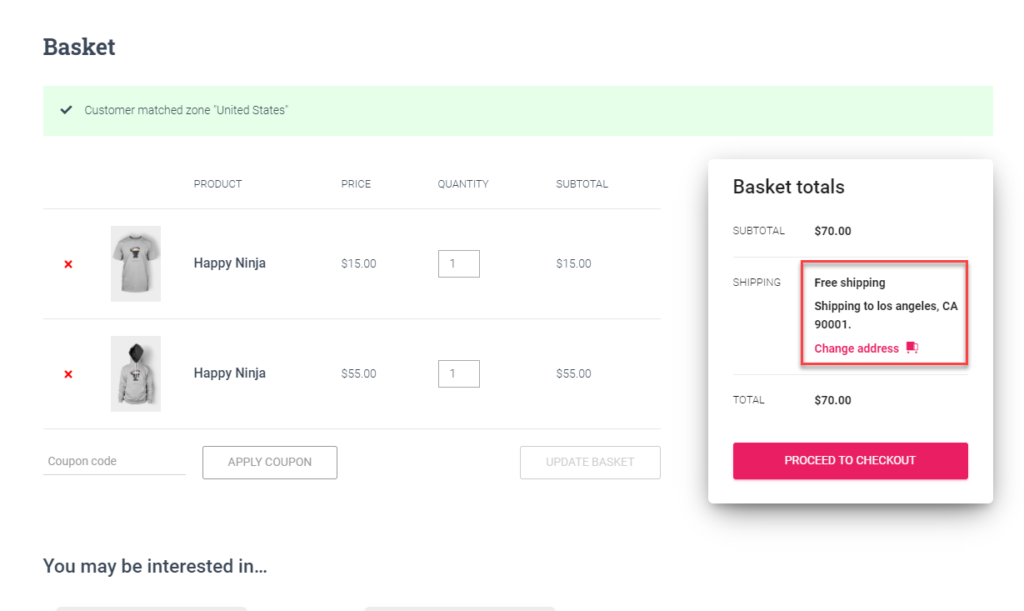
Setting up Free Shipping
Free shipping is an ideal way to get your customers into buying. It just attracts people much more than any other shipping strategy.
Here are the steps to follow for setting free shipping on your store:
Step 1: Go To WooCommerce Settings and select shipping from the settings
Step 2: Go to Shipping zones.
Step 3: Select Shipping Methods as Free shipping, from the options.
Step 4: Edit the Fress shipping settings that appear in the specific zone and apply the rate to be applied.
Step 5: Apply Taxes if you need it.
WooCommerce lets the store owners set up free shipping for their products. It is easy to set up free-shipping on your WooCommerce store. You need to select the shipping zone firstly and then set up free shipping from the shipping methods.
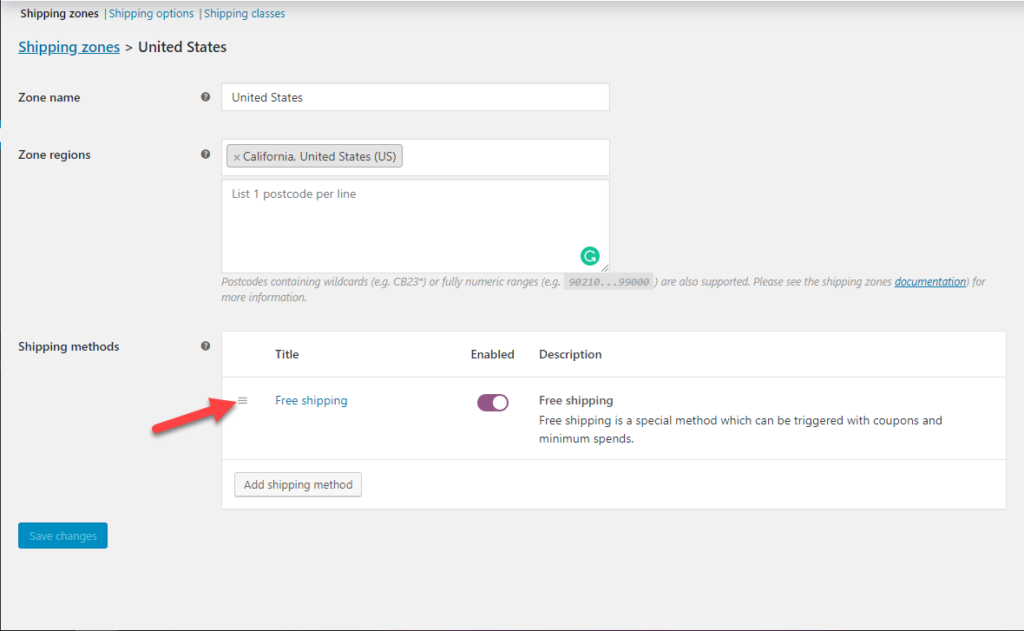
Once these settings are done, then you can see the changes reflected on the cart.
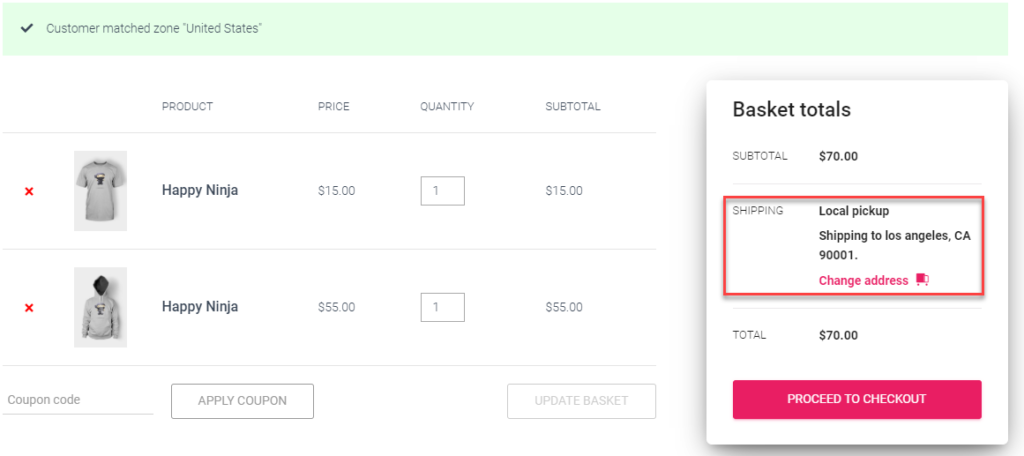
Setting Up Local Pickup
Here are the steps to follow :
Step 1: Go To WooCommerce Settings and select shipping.
Step 2: Select Shipping zones. Select shipping one depending on the store location.
Step 3: Select Shipping Methods as Local Pickup.
Step 4: Edit the Local Pickup settings and apply the rate to be applied, if needed
Step 5: Apply Taxes if you want to apply the same.
WooCommerce also lets setting up, local-pickup. Again you can set up local setup shipping methods for any of the shipping zones as per your need. Mostly this is done by shop owners who are locally selling and any customer can directly drop into the store and pick their items. This is one of the simplest shipping methods offered by stores.

Once this local pickup is set up, then you can see it on your cart.
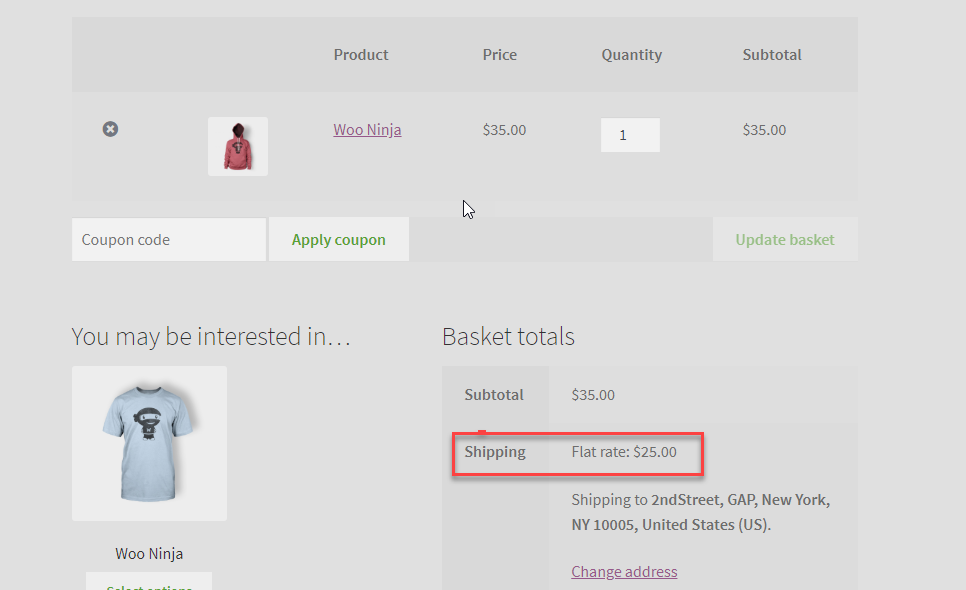
Setting Up Flat-rate
In simple terms, WooCommerce flat rate shipping is simply setting up a fixed shipping rate under a shipping zone.
Based on the nature of your products, you can create multiple flat rates under a shipping zone. To make the rates specific to the nature of the products, you can use product shipping classes also.
To set up flat-rate shipping, on your WooCommerce store, follow these simple steps :
Step 1: Go To WooCommerce Settings and select shipping.
Step 2: Select Shipping zones.
Step 3: Select Shipping Methods as Flat-rate, from free shipping, local pickup, and flat-rate.
Step 4: Edit the Flat-rate settings and apply the rate to be applied.
Step 5: Apply Taxes if you need it.
Steps in detail: How to Set up Flat-rate in WooCommerce Shipping
Firstly, Go to WooCommerce Settings and Select WooCommerce Shipping.
In the WooCommerce Shipping, select Shipping zones for offering your services.

In the shipping, zones select the shipping method you want to choose.

On selecting you will see a modal window with a drop-down, with three different options for shipping methods. These are Flat rate, Free shipping, and Local pickup.
Choose the flat rate shipping option, and click the Add shipping method button. Now, you can see that a flat rate shipping method is created inside the shipping zone.

You can enable or disable a shipping method under the shipping zone by using this button.
The next step is to specify the rates for your flat rate shipping. You can click the Edit option under the name of the shipping method for this. This will open another modal window, where you can specify the rates. You need to enter a name for the shipping method, which will be displayed in the frontend. The next option in the settings is setting the tax. You can set it to Taxable or not, depending on the need.
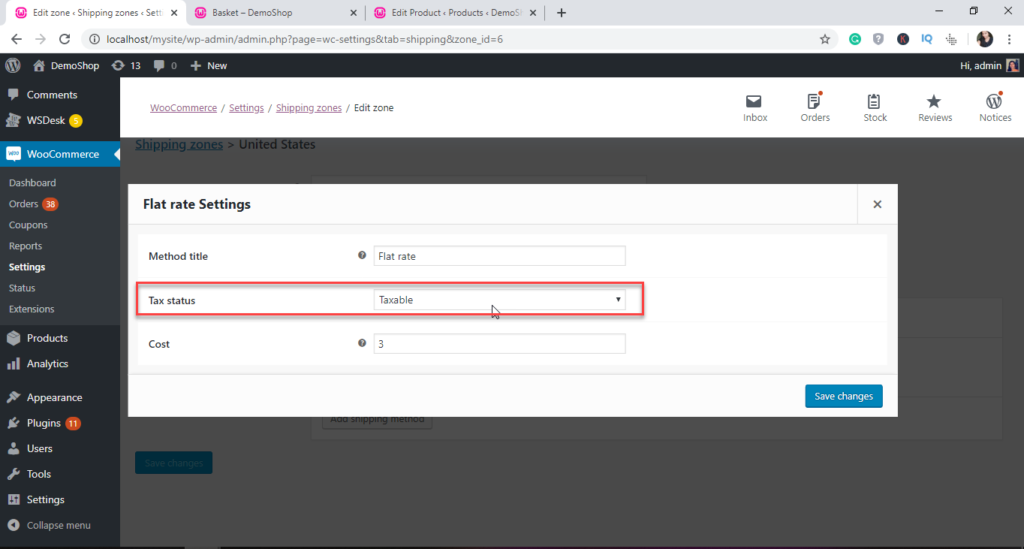
For example, if you want to charge $3, simply enter ‘3.00’ in the cost option. Upon doing so. When your customer makes a purchase from your shop, then the customer gets a $3, flat-rate amount charged for their order in the cart.
Per-Item Shipping in WooCommerce Shipping
Now let us find out what Per -Item Shipping is about.WooCommerce offers certain advanced methods to include flat-rate shipping charge per item.
[qty] – When you want to charge, additional shipping charges based on the number of products in the cart, you can use this placeholder.
[fee] – When you want to set up additional shipping charges based on the total order cost, you can use this one. This one has additional arguments that you can use along with it.
Some additional arguments to go with it are :
- percent – to set an additional shipping charge as a percentage.
- min_fee – to set a minimum value for additional charges.
- max_fee –to set a maximum value for additional charges.
Let us walk through some scenarios to understand it in a better way :
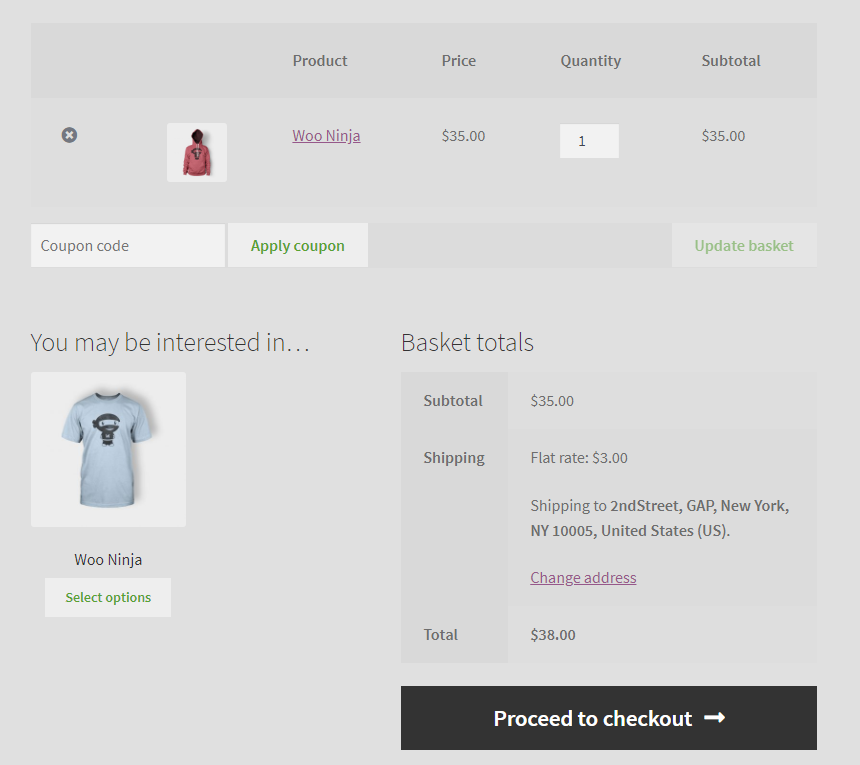
Suppose you want to keep the shipping charge like $3 per item in the cart, then you can do by adding a placeholder to set up the shipping cost. Now if the number of items in the cart is more, then per item the charge will be applied and the total will be the shipping charges.
Let us now consider yet another scenario :
Suppose you want to charge a base shipping cost, of $10 and based on the order amount, you want to charge a 10% shipping charge. Here, you can also set a minimum amount, where this additional charge will be applicable, say $5.
Let’s see how you can set it up.
In the shipping field, you can add the following : 20 + [fee percent=”10″ min_fee=”5″]
This means for all orders, a base shipping charge of $10 will be applied. Along with that, 10% of the order value will be added, as additional charges. Now, the minimum additional charge of $5, will be levied for orders with a lesser amount.
Let us take a look at it with an example: Suppose the customer is purchasing a product worth $35. The base shipping charge of $20 is applied. Along with that, ideally, 10% of $35 should be charged, which will be $3.5. However, since you have set a minimum value of 5, the additional charge will be $5. That makes the total shipping costs to be $25.
Now if it is a larger order with two products as shown here in the cart, then the $10 base charge and the additional 10% will be applied.
You can also add multiple shipping methods to the same region also.
Shipping Options in WooCommerce Shipping
In the WooCommerce shipping settings, you can provide the basic shipping options, you want to follow on your store.

You can set up the Calculations based on the shipping address provided on the cart page or even hide them until the shipping address is provided by the customer. And also you can opt whether the shipping destination is defaulted to the shipping address, or the customer billing address or even force the billing address to be the shipping destination.
Mostly a customer upon checking out the product from the cart has an option to provide an additional address, which is the billing address which can be different or the same as the shipment address.
Shipping Classes
You can set your shipping classes and then set up different shipping rates for the same. Using shipping classes, the store owner can set up various shipping classes depending on the need. With shipping classes, you can easily segregate your products based on classes like for freight shipping, delicates, fragile items, etc..
Let us assume we have two kinds of products categorized as fragile and bulky.
In the WooCommerce shipping settings, you need to add the shipping classes.
- Bulky for heavier items.
- Fragile for brittle and handle with care items.


Now in the Shipping methods modal window, you can also choose to apply these shipping charges. Here the calculation of the shipping charges can be either based on the order or based on the class ( bulky or fragile). Let us take a look at how to include the shipping classes in the product, before moving it to the carts.
Go To WooCommerce >> Products
In here, you can edit the product shipping data and then add the shipping class to it.
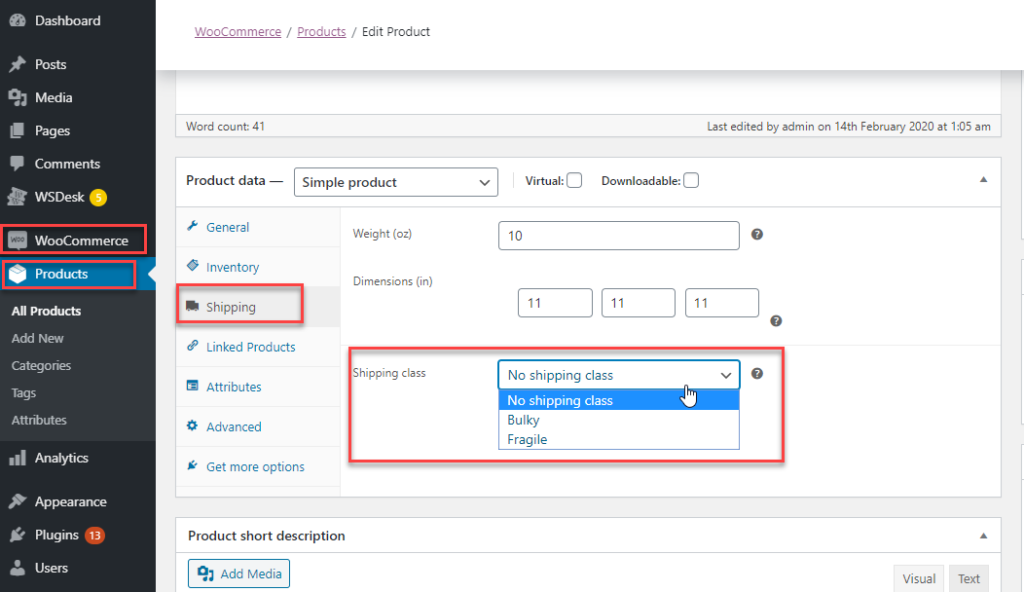
When you add the shipping class to the product, you can also set the flat-rate setting with respect to the shipping classes.

Once the costs per shipping class are added, then the flat-rate price will reflect on the store.

If there are multiple products from various shipping classes then the total shipping fare will be the total of all the shipping charges assigned to the bulky, fragile and no- shipping class costs assigned in the shipping settings.

Table Rate Shipping
If you see, all the stores sell different kinds of products with varied sizes and weights. Hence with just flat-rate, it doesn’t work, they need advanced methods to calculate shipping. Table rate shipping is one way of getting your complicated shipping calculations done without much hassle. To set up advanced shipping costs,you can use table rate shipping.
You can create rules based on
- the weight of the item.
- the shipping class
- the total number of items in the cart’ etc.
You can also fix the certain minimum and maximum value for shipping. Here you can provide shipping rates on the basis of: the weight, per line, per items, percentage of the item cost, etc.
Weight Based Shipping Settings for WooCommerce
WooCommerce shipping allows you to ship various products across locations with selected methods. But with WooCommerce, if you want to go for weight-based shipping, then you must look for using several shipping carriers to support the shipping process. WooCommerce allows easy integration with several popular shipping carriers like DHL, Australia Post, USPS, UPS, and FedEx easily. In order to integrate shipping carriers with WooCommerce, you can make use of the plugins to do the same.
Depending on your business needs you can set up your shipping using several WooCommerce shipping carriers. WooCommerce helps to easily integrate with these popular shipping carriers :
- WooCommerce USPS Shipping
- WooCommerce FedEx Shipping
- WooCommerce UPS Shipping
- WooCommerce Australia Post Shipping
- WooCommerce DHL Shipping
Using any one of these carriers, it becomes easy to not only ship your products to various locations (both Domestic and International) , but also it facilitates, printing labels as well as tracking. For example, if you consider shipping using USPS, then you just have to configure the WooCommerce plugin, that helps you integrate the USPS services to your WooCommerce store. ELEX USPS Shipping Plugin is one such extensive plugin, that helps to integrate USPS services which include exclusive flat-rate shipping across domestic and International locations without much hassle.
For Example, when you using the plugin like ELEX USPS Shipping plugin, then your customer gets live shipping rates upon purchasing to choose from.
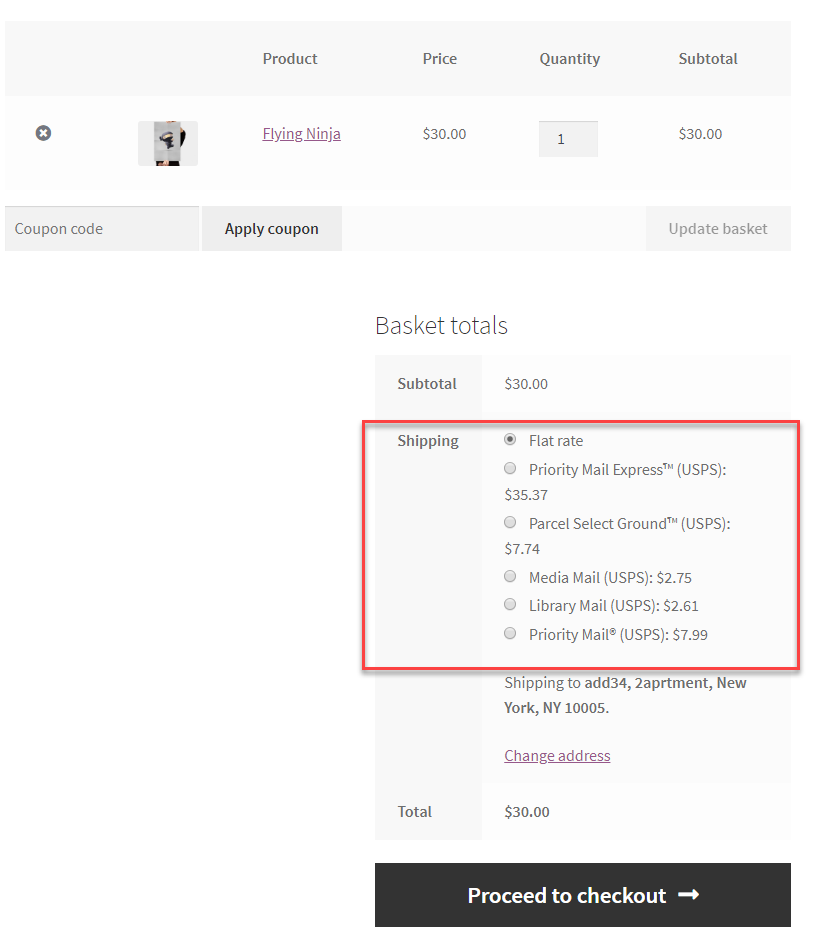
With this, upon the weight and dimension, it becomes easy to choose a type of flat-rate shipping that suite their need. Also, the store can generate a shipping label for the order generated and affix it with the order.
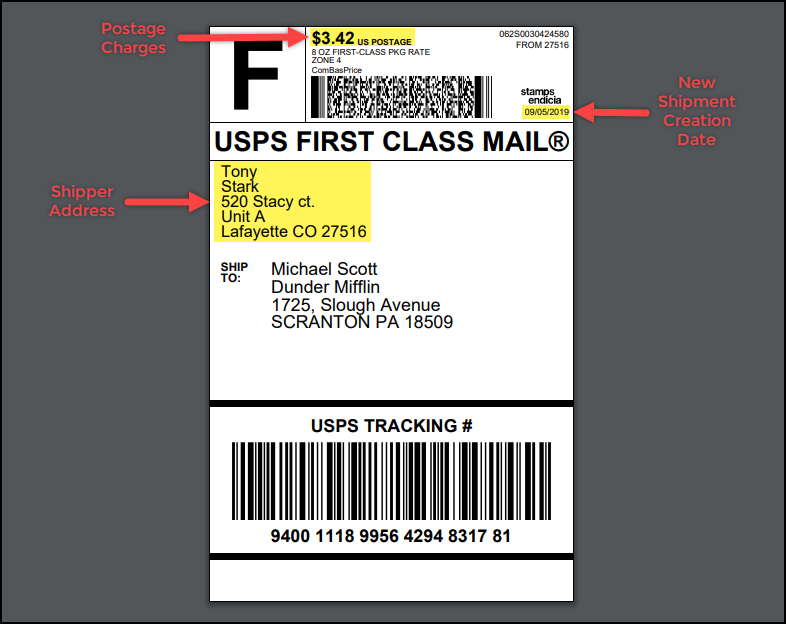
Moreover, with these kinds of shipping plugin integration, you can improve the customer experience by delivering fast and informative delivery. With each shipment, a tracking number is generated, which helps to track the product in transit.
To Conclude :
Woocommerce Shipping provides multiple options to successfully implement shipping for a simple store independently. And also lets to incorporate popular shipping plugins to give much more added features that makes it all the more appealing to the customers.

