What can we help you with?
An Effortless Approach to Create Bulk USPS Shipments with ELEX Stamps.com Shipping Plugin for WooCommerce
Creating bulk shipments can save a lot of time and effort while creating multiple USPS shipments. And since it is also one of the most sought-after features of our shipping plugins, we introduced this feature in our ELEX Stamps.com Shipping Plugin with USPS label for WooCommerce. The feature was already available in all other shipping plugins by ELEX. This feature is going to make the shipment creation an easier task for Stamps.com users in WooCommerce. So let’s get started with the steps involved for creating bulk USPS shipments.
Prerequisites
You will require:
to create bulk USPS shipments and print the respective shipping labels for your WooCommerce store. Here is a video guide.
Creating Bulk USPS Shipments with Stamps.com Shipping Plugin with USPS Postage
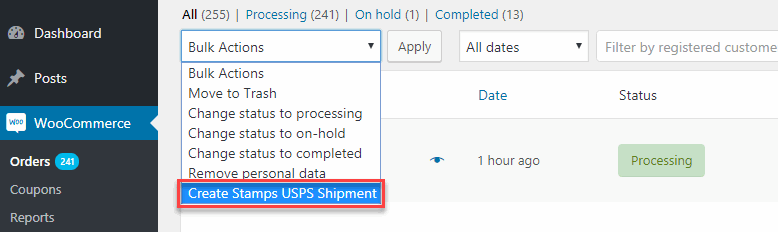
If you have Stamps.com Shipping Plugin with USPS label for WooCommerce installed to your WooCommerce store, you can find the Bulk Shipment option among the ‘Bulk Actions’ menu in the Orders Page.
You can select all the orders for which you want to create shipments in one go. The services selected by your customers are used for the shipment creation. For instance, if one order has Priority Mail selected and the other order has First Class Mail, the shipments will be created based on the selected services automatically.
So to start creating bulk USPS shipments:
- Go to your WooCommerce Orders
- Select multiple orders by checking the boxes on the left.
- Click on Bulk Actions.
- Select ‘Create Stamps USPS Shipment’ from the drop-down.
- And, hit the Apply button.
This will be followed by confirmation messages. These confirmation messages may take some time, which depends on the number of orders selected. So it is recommended not to refresh the page until you get the confirmation messages.

These shipments are created as per the USPS services selected by the customers in the cart and checkout pages. If shipments already exist, you’ll be notified about them too. Once you get these messages, you can directly go for printing the labels.
But before that, let’s see how to set a default shipping service for the orders placed with free shipping and flat rates, where your customers don’t have to select a shipping service. In these cases, you have to set a default service so these orders are not left just because there were no USPS services assigned to them.
Setting Default Services for Bulk Shipments
As mentioned earlier, the default service is used in case there is no USPS service is available at the time of creation of bulk shipments. You can select the available service from the drop-down in the text boxes. Since you might need to apply different services for domestic and international shipping, both domestic and international services are available in the settings.

To get to Bulk Shipment option:
Click on your WordPress dashboard and follow the string. WooCommerce> Settings> Shipping Settings> Stamps – USPS and since we are setting up a bulk shipment option, move to the Label Generation Tab. Now, scroll down to Bulk shipment and select the default services for domestic and international shipments respectively. Finally, click on Save Changes to apply the services.
The default services available for domestic shipments are:
- First Class Mail
- Priority Mail Express
- Media Mail Parcel
- Library Mail
- USPS Parcel Post
- USPS Parcel Select
- USPS Critical Mail
- Priority Mail
The default services available for international services are:
- Priority Mail Express International
- Priority Mail International
- First Class Package Service International
Printing Labels for Created USPS Shipments
So now when you have created bulk shipments and checked the default services, you can go for printing labels. To do so, click on the order number in the Order page to go to the edit order page. Scroll down to the stamps.com shipment label section, to find the Tracking Number generated, the box dimension and package weight, the cancel shipment option, and the print label option.
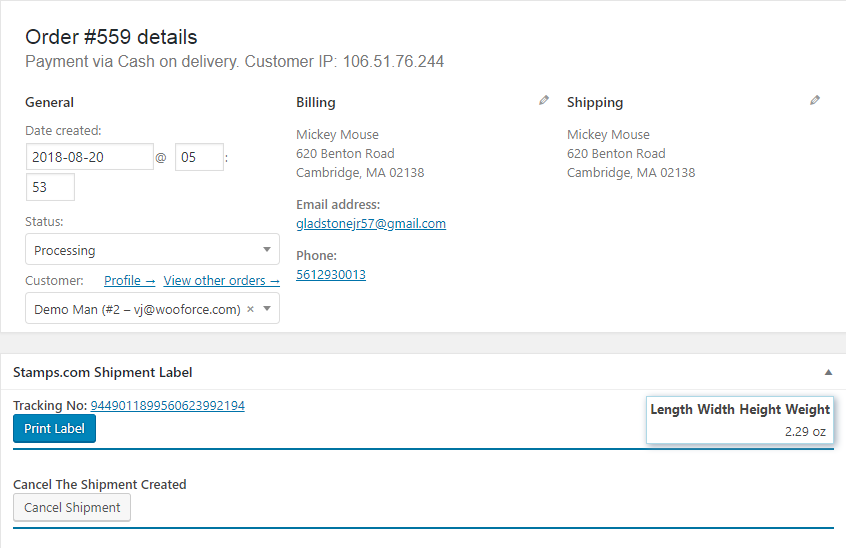
To print labels, click on the Print Label button. This will open the label in the next tab. You can save the label as a local file or send it to your label printers directly.
And yes, if in any case, you created an incorrect shipment, you can cancel it by using the Cancel Shipment button. This will cancel the created shipment and you can start afresh by selecting a USPS service from the drop-down to create a new shipment. You’ll receive a new tracking number and a new label to print.
Bottom Line
With ELEX Stamps.com Shipping plugin with USPS label for WooCommerce, you can automate your shipping strategy with ease. Unlike USPS, Stamps.com provides a wide range of services without any restrictions. These services include:
- Commercial and Discounted Postage without any minimum limit in shipment volume.
- Refunds for USPS Labels created with Stamps.com. More on USPS label refunds.
- Print the same Label multiple times.
- Higher limits of Shipping Insurance.
- Lesser paperwork compared to USPS.
If you don’t already have our Stamps.com Shipping Plug-in with USPS Label for WooCommerce, get it today at XAdapter.com. And if you are already one of our 40 thousand+ valuable customers, get the updated version as a part of your subscriptions, and start creating bulk USPS shipments with Stamps.com.
For any further queries, contact us at our online support or leave a comment below.